Safety First
Before starting any work on the hammer drill, always prioritize safety. Unplug the drill from the power source. This simple yet crucial step prevents any accidental activation during the bit – changing process, which could lead to serious injury. Additionally, put on a pair of safety glasses. Hammer drills can kick up debris, especially when bits are being removed or inserted, and safety glasses protect your eyes from potential harm. If you’re working in an area with a lot of fine dust, such as when drilling concrete, consider wearing a dust mask as well.
Identifying the Right Bit
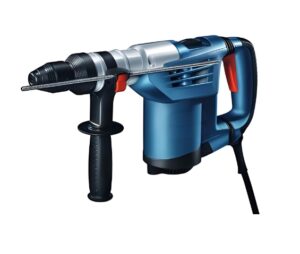
Bosch offers a wide range of bits suitable for different materials and applications. For the Bosch 11264EVS, which is a powerful rotary hammer drill, common types of bits include SDS – Max bits. These bits are designed specifically for heavy – duty applications like drilling into concrete, masonry, and stone.
SDS – Max Bit Features
- Shank Design: SDS – Max bits have a unique shank design that allows for quick and secure attachment to the drill. The shank has two grooves and a flat section. This design not only ensures a proper fit but also enables the bit to receive the full force of the drill’s hammering action.
- Bit Tips: Depending on the application, the tips of SDS – Max bits vary. For example, a carbide – tipped bit is ideal for drilling into hard concrete. The carbide tip is extremely hard and wear – resistant, allowing for efficient drilling. Some bits may also have a spade – like tip for chiseling applications.
When choosing a bit, consider the following factors:
- Material to be Drilled: If you’re working on a concrete wall, a carbide – tipped SDS – Max bit is a must. For softer materials like wood or plastic, a different type of bit (although not typically used with this rotary hammer drill) would be more appropriate.
- Hole Size and Depth: The diameter and length of the bit should match your project requirements. For larger – diameter holes in concrete, you’ll need a larger – sized SDS – Max bit. Make sure to check the drill’s specifications to ensure it can accommodate the bit size you choose.
Locating the Bit Holder
On the Bosch 11264EVS, the bit is held in place by an SDS – Max chuck. The chuck is located at the front of the drill. It’s the part that grips the shank of the bit securely. The SDS – Max chuck on this model is designed for easy bit changes. It has a locking mechanism that holds the bit firmly during operation and allows for quick release when it’s time to change the bit.
Removing the Old Bit
- Unlock the Chuck: The SDS – Max chuck on the Bosch 11264EVS has a locking sleeve. To unlock the chuck, grasp the drill firmly with one hand. Then, with the other hand, pull back the locking sleeve located at the base of the chuck. This sleeve is designed to be easily gripped, and pulling it back disengages the locking mechanism that holds the bit in place.
- Remove the Bit: Once the locking sleeve is pulled back, you can remove the old bit. Simply pull the bit straight out of the chuck. If the bit is stuck, do not use excessive force. Try gently jiggling the bit while pulling. In some cases, the bit may be stuck due to debris or hardened material around the shank. If this is the case, you can use a small brush or compressed air to clean around the shank area before attempting to remove the bit again.
Inspecting the Chuck and Bit Seat
After removing the old bit, take a moment to inspect the chuck and the bit seat.
- Chuck Inspection: Look for any signs of damage on the chuck jaws. If the jaws are bent, chipped, or worn, it can affect the performance of the drill and the security of the new bit. Check if the locking mechanism of the chuck (the part that engages with the grooves on the bit shank) is working properly. If there are any issues with the chuck, it may need to be repaired or replaced before inserting a new bit.
- Bit Seat Inspection: The bit seat is the area inside the chuck where the bit rests. Make sure there is no debris, dirt, or hardened material in the bit seat. Any foreign matter in this area can prevent the new bit from seating properly. Use a clean, dry cloth to wipe out the bit seat. If there are stubborn deposits, a small amount of lubricant or a solvent (suitable for the materials of the drill) can be used to clean it, but make sure to wipe away any excess lubricant or solvent before inserting the new bit.
Inserting the New Bit
- Align the Bit: Take the new SDS – Max bit and align the grooves on the shank with the corresponding ridges inside the chuck. The flat section on the shank of the bit should also be oriented correctly. This proper alignment is crucial for the bit to be securely held and to function correctly.
- Insert the Bit: Gently push the bit into the chuck. As you push, you should feel the bit slide smoothly into place. The bit should be inserted until it is fully seated in the chuck. You may hear a clicking sound as the locking mechanism engages with the grooves on the bit shank. This clicking sound indicates that the bit is properly locked in place.
Testing the Bit Installation
Once the new bit is inserted, it’s important to test the installation before starting any drilling work.
- Visual Inspection: First, visually inspect the bit to make sure it is centered in the chuck. If the bit appears to be off – center, it could cause vibrations during drilling and may even damage the drill or the bit.
- Pull Test: Give the bit a gentle tug. It should not move or come out of the chuck. If the bit does move or can be easily pulled out, it means the bit is not properly installed. In this case, repeat the steps of inserting the bit, making sure to align it correctly and push it fully into the chuck.
- Idle Run: With the drill still unplugged, hold the drill in your hand and turn the chuck by hand. The bit should rotate smoothly without any wobbling or catching. If you feel any resistance or notice any abnormal movement, there may be an issue with the bit installation or the chuck.
Powering On and Starting to Drill
After successfully testing the bit installation, you can now plug the drill back into the power source. Before starting to drill, make sure you have a firm grip on the drill. Place your dominant hand on the main handle and your other hand on the auxiliary handle (if the drill has one). Start with a slow speed setting, especially if you’re drilling into a hard material. As you drill, apply a steady pressure, but do not force the drill. Let the drill’s hammering and rotating action do the work. If you encounter excessive resistance or the drill starts to vibrate abnormally, stop drilling immediately and check the bit and the material you’re working on.
Common Issues and Troubleshooting
Bit Won’t Lock in Place
- Possible Cause: Incorrect alignment of the bit shank in the chuck. The grooves on the shank may not be properly lined up with the ridges in the chuck, or the bit may not be inserted far enough.
- Solution: Remove the bit and carefully realign it. Make sure the grooves and the flat section of the shank are correctly positioned. Push the bit firmly into the chuck until you hear the locking mechanism click.
Bit Falls Out During Drilling
- Possible Cause: The locking mechanism in the chuck may be damaged or dirty. Debris in the chuck can prevent the locking mechanism from engaging fully with the bit shank.
- Solution: Inspect the chuck for any signs of damage. Clean the chuck thoroughly, removing any debris or dirt. If the locking mechanism is damaged, you may need to replace the chuck or have it repaired by a professional.
Excessive Vibration During Drilling
- Possible Cause: The bit may not be properly installed, resulting in an off – center rotation. Another possibility is that the bit is worn out or damaged.
- Solution: Check the bit installation. If the bit is not centered, remove and reinstall it. If the bit is worn or damaged, replace it with a new one.
Maintenance of the Drill and Bits
To ensure the long – term performance of your Bosch 11264EVS hammer drill and its bits, regular maintenance is essential.
- Cleaning: After each use, wipe down the drill with a clean cloth to remove any dust, dirt, or debris. Pay special attention to the chuck area, as this is where debris can accumulate and affect bit changes.
- Lubrication: Periodically lubricate the moving parts of the drill, such as the gears and the chuck mechanism. Use a lubricant recommended by Bosch. This helps to reduce friction and wear, ensuring smooth operation.
- Inspection: Regularly inspect the drill for any signs of damage, such as cracks in the housing, worn – out cords (if it’s a corded drill), or loose parts. If you notice any issues, have the drill repaired promptly.
- Cleaning: After each use, clean the bit to remove any material that may be stuck to it. For carbide – tipped bits, you can use a wire brush to remove concrete or masonry debris.
- Sharpening: Over time, the tip of the bit may become dull. For some types of bits, such as those used for wood or metal drilling, you can sharpen the tip using a file or a sharpening tool. However, for carbide – tipped bits used in concrete drilling, sharpening is more difficult and may require professional equipment. If a carbide – tipped bit is too dull, it’s often more practical to replace it.
- Storage: Store your bits in a clean, dry place. You can use a bit case or a toolbox with compartments to keep the bits organized and protected from damage.
Bosch Hammer Drill Models and Their Bit Compatibility
Bosch offers a diverse range of hammer drill models, each with its own features and bit compatibility.
- Bosch 11264EVS: As mentioned earlier, this is a powerful 13 – amp SDS – Max rotary hammer drill. It is designed for heavy – duty applications such as drilling large – diameter holes in concrete, masonry, and stone. It is compatible with SDS – Max bits, which come in various sizes and tip designs to suit different projects.
- Bosch GSH18V – 32: This is a cordless hammer drill that operates on an 18V battery. It is more suitable for light – to – medium – duty tasks. It uses SDS – Plus bits, which are smaller in size compared to SDS – Max bits. SDS – Plus bits are commonly used for drilling into brick, block, and light – duty concrete. The GSH18V – 32 is a great option for DIYers and professionals who need a portable, cordless hammer drill for jobs where a corded drill may not be practical.
- Bosch GDS18V – LI: Another cordless model, this drill also uses an 18V battery. It is designed for general – purpose drilling and driving tasks. It has a keyless chuck that can accommodate a variety of drill bits, including standard twist bits for wood and metal drilling. While it may not have the same hammering power as the SDS – Max or SDS – Plus models, it is a versatile tool for a wide range of applications around the house or on the job site.
- Bosch GBH2 – 26 DRE: This is a corded hammer drill with a variable – speed feature. It is compatible with SDS – Plus bits. The variable – speed function allows for more control when drilling different materials. For example, when starting a hole in a delicate material like tile, you can use a lower speed, and then increase the speed as the bit penetrates deeper. It also has a reverse function, which is useful for removing stuck bits or for driving screws in reverse.
When choosing a Bosch hammer drill, consider your specific needs in terms of power, portability, and the types of materials you’ll be working with. This will help you select the right model and the appropriate bits for your projects.
Conclusion
Changing the bit on a Bosch 11264EVS hammer drill is a relatively straightforward process when you follow the proper steps. By ensuring safety, choosing the right bit, correctly removing and inserting the bit, and performing regular maintenance, you can keep your drill in top working condition and complete your projects efficiently. Whether you’re a professional contractor or a DIY enthusiast, understanding how to handle your tools properly is key to achieving good results. Remember to always refer to the manufacturer’s instructions that come with your specific Bosch hammer drill model, as there may be slight variations in the bit – changing process depending on the model.