Disassembling a hammer drill bit requires precision, patience, and an understanding of the specific mechanisms used in various models. Whether you’re performing maintenance, replacing a worn-out bit, or troubleshooting an issue, knowing how to safely and effectively disassemble your hammer drill bit is essential. This guide provides detailed instructions for several popular brands and models, ensuring you can handle your equipment with confidence.
1. Understanding Hammer Drill Bits and Their Components
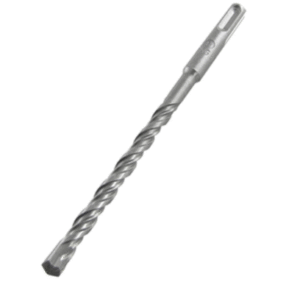
Before diving into disassembly, it’s crucial to understand the basic components of a hammer drill bit. A typical hammer drill bit consists of the following parts:
- Shank: The part that fits into the drill’s chuck or collet. It’s usually cylindrical and may have a specific shape (e.g., SDS-Plus, SDS-Max) to match the drill’s chuck type.
- Body: The main shaft of the bit that extends from the shank to the cutting edge. It’s often made of high-speed steel (HSS) or carbide for durability.
- Flutes: Spiral grooves that run along the length of the bit. They help remove debris from the hole as you drill, preventing clogging and overheating.
- Cutting Edge: The tip of the bit that does the actual drilling. It’s usually made of carbide for hard materials like concrete or masonry.
- Chuck or Collet: The part of the drill that holds the bit in place. It can be a keyed chuck, keyless chuck, or a specialized collet system like SDS (Slotted Drive System).
Understanding these components will help you identify which parts need to be handled carefully during disassembly and reassembly.
2. Safety Precautions Before Disassembly
Before you begin disassembling your hammer drill bit, take the following safety precautions to protect yourself and your equipment:
- Unplug the Drill: If your drill is corded, unplug it from the power source to prevent accidental activation. For cordless drills, remove the battery.
- Wear Protective Gear: Put on safety glasses to protect your eyes from flying debris, and gloves to protect your hands from sharp edges.
- Work in a Clean, Well-Lit Area: A cluttered workspace can lead to accidents. Make sure you have enough light to see what you’re doing.
- Use the Right Tools: Have the appropriate tools on hand, such as a chuck key (if needed), pliers, or a small hammer for tapping loose parts.
- Refer to the Manual: If you have the drill’s user manual, consult it for specific disassembly instructions and safety warnings.
3. Disassembling Hammer Drill Bits for Different Brands and Models
Now, let’s dive into the disassembly process for several popular hammer drill brands and models. Each section will provide detailed steps for safely removing the drill bit from its chuck or collet.
3.1. DeWalt Hammer Drills (e.g., DeWalt D25263K SDS-Plus Rotary Hammer Drill)
DeWalt is known for its durable and high-performance power tools, including hammer drills. The D25263K is a popular SDS-Plus rotary hammer drill that’s commonly used for drilling into concrete, masonry, and other hard materials.
- Step 1: Release the Chuck: Locate the chuck release button or lever on the side of the drill. Press or slide it to open the chuck jaws.
- Step 2: Remove the Bit: With the chuck open, gently pull the bit straight out of the chuck. If the bit is stuck, you may need to wiggle it slightly while pulling.
- Step 3: Inspect the Chuck: Check the chuck jaws for any debris or damage that may be preventing the bit from releasing easily. Clean the chuck with a soft brush or compressed air if necessary.
- Step 4: Reassemble (if needed): To insert a new bit, simply open the chuck, insert the bit’s shank into the chuck, and tighten the jaws by squeezing the trigger or rotating the chuck sleeve (depending on the model).
3.2. Bosch Hammer Drills (e.g., Bosch RH328VC 1-1/8-Inch SDS-plus Rotary Hammer)
Bosch is another leading manufacturer of power tools, offering a wide range of hammer drills for various applications. The RH328VC is a powerful SDS-plus rotary hammer that’s ideal for heavy-duty drilling tasks.
- Step 1: Locate the Chuck Release: On the Bosch RH328VC, the chuck release is typically a button or lever located near the front of the drill, just behind the chuck.
- Step 2: Open the Chuck: Press or slide the chuck release to open the chuck jaws. You may need to hold the drill firmly with one hand while operating the release with the other.
- Step 3: Remove the Bit: Once the chuck is open, pull the bit straight out. If the bit is difficult to remove, try tapping the end of the bit gently with a small hammer to loosen it.
- Step 4: Clean and Inspect: After removing the bit, inspect the chuck for any signs of wear or damage. Clean the chuck jaws with a brush or cloth to remove any debris that may have accumulated.
- Step 5: Reinstall a New Bit: To insert a new bit, open the chuck, align the bit’s shank with the chuck jaws, and push the bit in until it’s seated firmly. Release the chuck release to tighten the jaws around the bit.
3.3. Makita Hammer Drills (e.g., Makita HR2475 1-Inch SDS-Plus Rotary Hammer)
Makita is renowned for its high-quality, reliable power tools, and the HR2475 is no exception. This SDS-plus rotary hammer is designed for efficient drilling in concrete and masonry.
- Step 1: Prepare the Drill: Ensure the drill is turned off and unplugged (or the battery is removed if it’s cordless).
- Step 2: Access the Chuck: The chuck on the Makita HR2475 is typically a keyless chuck, which means you don’t need a special tool to open it.
- Step 3: Open the Chuck: Grasp the chuck sleeve (the part that rotates to tighten or loosen the jaws) with one hand and the drill’s handle with the other. Rotate the chuck sleeve counterclockwise to open the jaws.
- Step 4: Remove the Bit: Once the jaws are open, pull the bit straight out. If the bit is stuck, you can try tapping it gently with a hammer or using pliers to grip and pull it out (be careful not to damage the bit or chuck).
- Step 5: Install a New Bit: To insert a new bit, open the chuck jaws as described above, insert the bit’s shank, and rotate the chuck sleeve clockwise to tighten the jaws around the bit. Make sure the bit is securely fastened before using the drill.
3.4. Hilti Hammer Drills (e.g., Hilti TE 30-A36 Cordless Rotary Hammer)
Hilti is a premium brand known for its professional-grade power tools and construction equipment. The TE 30-A36 is a cordless rotary hammer that offers excellent performance and durability.
- Step 1: Power Down the Drill: Turn off the drill and remove the battery to ensure it can’t accidentally activate during disassembly.
- Step 2: Locate the Chuck Mechanism: The Hilti TE 30-A36 uses an SDS-plus chuck system, which is designed for quick and easy bit changes.
- Step 3: Release the Bit: Press the chuck release button (usually located near the front of the drill) to open the chuck jaws. You may need to hold the drill steady while pressing the button.
- Step 4: Extract the Bit: With the chuck open, pull the bit straight out. If the bit is tightly seated, you can try wiggling it slightly while pulling or tapping it gently with a hammer.
- Step 5: Check the Chuck: After removing the bit, inspect the chuck for any signs of damage or wear. Clean the chuck jaws with a brush or cloth to remove any debris.
- Step 6: Insert a New Bit: To install a new bit, open the chuck, insert the bit’s shank, and release the chuck release button. The jaws should automatically tighten around the bit, but you can give it a gentle tug to ensure it’s secure.
3.5. Milwaukee Hammer Drills (e.g., Milwaukee 2712-20 M18 Fuel SDS Plus Rotary Hammer)
Milwaukee is a well-respected brand in the power tool industry, offering a range of high-performance hammer drills. The 2712-20 is a cordless SDS-plus rotary hammer that’s popular among professionals and DIY enthusiasts alike.
- Step 1: Safety First: Turn off the drill and remove the battery to prevent any accidental start-ups.
- Step 2: Identify the Chuck Type: The Milwaukee 2712-20 uses an SDS-plus chuck system, which allows for quick and tool-free bit changes.
- Step 3: Open the Chuck: Locate the chuck release mechanism, which is typically a button or lever near the front of the drill. Press or slide the release to open the chuck jaws.
- Step 4: Remove the Old Bit: Once the chuck is open, pull the bit straight out. If the bit is stuck, you can try tapping it gently with a hammer or using pliers to grip and pull it out (be careful not to damage the bit or chuck).
- Step 5: Prepare for Reassembly: Before inserting a new bit, inspect the chuck jaws for any debris or damage. Clean the chuck if necessary to ensure a secure fit for the new bit.
- Step 6: Install the New Bit: Open the chuck jaws, insert the new bit’s shank into the chuck, and release the chuck release mechanism. The jaws should tighten around the bit automatically. Give the bit a gentle tug to confirm it’s securely fastened.
4. Troubleshooting Common Issues During Disassembly
Even with careful handling, you may encounter some issues when disassembling your hammer drill bit. Here are some common problems and their solutions:
- Stuck Bit: If the bit is stuck in the chuck and won’t come out, try tapping it gently with a small hammer to loosen it. You can also try spraying a small amount of penetrating oil (like WD-40) into the chuck jaws to help lubricate and free the bit. If these methods don’t work, you may need to use pliers to grip the bit and pull it out (be careful not to damage the bit or chuck).
- Damaged Chuck Jaws: If the chuck jaws are damaged or worn, they may not grip the bit securely, making it difficult to remove or insert a new bit. In this case, you’ll need to replace the chuck or have it repaired by a professional.
- Chuck Release Mechanism Not Working: If the chuck release button or lever isn’t working properly, check for any debris or damage that may be preventing it from operating. Clean the mechanism with a brush or compressed air, and try lubricating it with a small amount of machine oil if necessary. If the problem persists, you may need to have the chuck mechanism repaired or replaced.
5. Maintaining Your Hammer Drill and Bits for Longevity
Proper maintenance is key to ensuring your hammer drill and bits last for years to come. Here are some tips for maintaining your equipment:
- Clean the Chuck Regularly: After each use, clean the chuck jaws with a brush or cloth to remove any debris that may have accumulated. This will help ensure a secure grip on the bit and prevent premature wear.
- Inspect Bits for Damage: Before using a bit, inspect it for any signs of damage, such as chips, cracks, or excessive wear. Damaged bits can break during use, potentially causing injury or damage to your drill.
- Store Bits Properly: When not in use, store your bits in a dry, clean place to prevent rust and corrosion. You can use a bit holder or case to keep them organized and protected.
- Lubricate Moving Parts: Periodically lubricate the chuck mechanism and any other moving parts on your drill with a small amount of machine oil. This will help keep the drill running smoothly and prevent premature wear.
- Follow the Manufacturer’s Recommendations: Always refer to the drill’s user manual for specific maintenance instructions and recommendations. Following the manufacturer’s guidelines will help ensure your drill operates safely and efficiently.
6. Conclusion
Disassembling a hammer drill bit is a straightforward process when you have the right tools and knowledge. By following the steps outlined in this guide for different brands and models, you can safely remove and replace your drill bits with confidence. Remember to take the necessary safety precautions, inspect your equipment regularly, and perform proper maintenance to keep your hammer drill and bits in top condition. With a little care and attention, your hammer drill will provide you with reliable performance for all your drilling needs.
