Our Location
304 North Cardinal St.
Dorchester Center, MA 02124
304 North Cardinal St.
Dorchester Center, MA 02124
Introduction
Furniture installation is a rewarding yet often challenging task. Whether you are assembling a simple bookcase, installing kitchen cabinetry, or mounting a heavy-duty wall shelf, having the right tools and knowing how to use them effectively can make the process smooth, safe, and efficient. Among the array of power tools available, the household electric impact drill stands out as a versatile workhorse. Unlike standard drills or manual screwdrivers, impact drills combine torque and impact force to drive screws and fasteners cleanly through wood, metal, and composite materials, which is often necessary when installing or fastening furniture components. In this comprehensive guide, you will find in-depth tips for using a household electric impact drill specifically tailored to furniture installation tasks. We will cover everything from safety precautions and proper setup to selecting the ideal accessories and choosing the best brands and models.
Throughout this guide, each section will be rich with detailed explanations, practical advice, and real-world examples. We have intentionally structured the content so that lists (such as recommended safety gear or accessory types) are clearly separated with bolded titles followed by explanatory paragraphs. Paragraphs themselves are designed to be substantial, ranging from several dozen to over a hundred words each, ensuring in-depth discussion and context. By the end of this guide, you will have a thorough understanding of how to leverage a household electric impact drill for all your furniture installation projects, learn about top-performing brands and models, and gain confidence in handling even the most demanding tasks.
Understanding the Household Electric Impact Drill
A household electric impact drill—sometimes referred to as an impact driver—combines rotational force with concussive blows to the screw or fastener. This unique mechanism empowers the drill to overcome resistance more effectively than a conventional cordless or corded drill. In furniture installation, especially when working with hardwoods, dense boards, or metal brackets, driving screws by hand or even with a regular drill can strip screw heads, damage materials, or slow down the process considerably. The impact drill addresses these problems by transmitting high torque in short bursts, reducing cam-out and minimizing the risk of damaging both screw heads and surrounding surfaces.
It is crucial to distinguish between an impact drill (often called an impact driver) and a hammer drill. While a hammer drill delivers rapid percussive blows along the rotary axis (designed for drilling into concrete and masonry), an impact drill delivers concussive rotational impacts, making it ideal for driving screws into wood or metal. In furniture installation, you rarely need the drilling-percussion combination that a hammer drill provides; instead, you need high torque to sink screws quickly without overdriving or stripping. That is where the household electric impact drill shines.
Modern household impact drills are often cordless, powered by lithium-ion battery packs ranging from 12V to 20V. Some heavy-duty models even use 18V or 20V batteries to achieve maximum torque while maintaining portability. Cordless models eliminate the hassle of power cords and allow you to maneuver around pieces of furniture, into tight cabinets, or up ladders without restriction. The impact driver’s compact size and ergonomic design further enhance maneuverability, making it the tool of choice for DIY enthusiasts and professionals alike who frequently install furniture.
Advantages of Using an Impact Drill for Furniture Installation
An electric impact drill offers numerous advantages over manual screwdrivers and standard drills when it comes to furniture installation. One of the primary benefits is the high torque output, which makes it effortless to drive long or large-diameter screws through hardwoods, particleboard, MDF, or composite materials commonly used in furniture. When installing wall-mounted furniture or heavy cabinetry, this high torque helps secure fasteners into studs or anchors without bogging down or stalling.
Another advantage is speed. With the percussive action, screws are driven in quickly, significantly reducing installation time. Imagine building a large kitchen cabinet unit with dozens of hinges, corner braces, and mounting screws: what would take hours with a manual screwdriver or a standard drill can often be completed in a fraction of the time with an impact driver. In addition, the impact driver’s reduced cam-out effect—where the bit slips out of the screw head—minimizes damage to screw heads and surrounding surfaces, preserving the aesthetic quality of your finished work.
Impact drills also exert less effort on the user. Because the concussive force automatically counters resistance, you do not have to apply downward pressure or torque by hand. This feature is particularly beneficial when working overhead or in awkward positions, such as mounting floating shelves or assembling closet rods. In long sessions, reduced strain translates to less fatigue, allowing you to maintain consistent performance and precision across multiple installation tasks.
Finally, impact drivers are versatile. By swapping out bits, you can use them to drive different screw types, remove old fasteners, or even, with the appropriate adapter, drill pilot holes. Though they do not excel at precision drilling (for that, one would use a dedicated drill/driver with adjustable clutch settings), their adaptability makes them indispensable in any furniture installation scenario, from assembling ready-to-assemble (RTA) pieces to installing built-in units.
Safety Precautions for Using an Impact Drill
Recommended Safety Gear
Protective Eyewear
Hearing Protection
Gloves
Dust Mask
Before operating an impact drill, always ensure you have the proper safety gear. First and foremost, wear protective eyewear to guard against wood chips, metal shavings, or fragments of fasteners that may fly when the drill contacts the material. Impact drives often produce small splash patterns of debris from behind the bit, so safety glasses or a full-face shield is highly recommended.
Eating into hardwood or metal without eye protection can lead to serious ocular injuries. Though impact drivers are less likely to throw larger fragments compared to larger tools like routers or circular saws, the high-speed torque and concussive action still generate enough debris to justify goggles. When installing furniture overhead—such as raising cabinets or shelves—always wear impact-rated safety glasses to ensure maximum coverage from all angles.
Hearing protection is equally important. While most household impact drills are not as noisy as large pneumatic tools, they still generate a distinct buzzing or clicking sound when driving screws, especially at high torque. Over prolonged periods, this noise can contribute to hearing fatigue or loss. Simple foam earplugs or over-ear muffs rated for general construction work will suffice.
Wearing gloves can protect your hands from splinters, sharp edges, and potential pinch points when handling hardware or maneuvering large furniture pieces. However, ensure the gloves do not compromise your grip or tactile sense. Some professionals prefer lightweight work gloves with grip-enhancing palms, allowing them to maintain dexterity. If the gloves are too bulky, you may lose control over the drill, increasing the risk of slips.
Lastly, depending on the material and environment, consider a dust mask or respirator. Drilling into MDF, particleboard, or plywood can generate fine dust that is harmful if inhaled—particularly if you are sensitive to formaldehyde or other adhesives used in composite boards. Even natural wood dust can exacerbate allergies or respiratory issues. A simple N95-rated dust mask will filter out most airborne particles.
Workspace Preparation
Adequate Lighting
Stable Work Surface
Clear of Obstructions
Secure Furniture Components
An often-overlooked safety precaution is adequately preparing the workspace. Ensure that the area where you plan to install or assemble furniture is well-lit to prevent misalignment or accidental slips. If you must work late in the day or in a dim basement, set up portable work lights or headlamps to avoid shadowed work zones. Poor lighting can cause you to misjudge angles, leading to stripped screws or misaligned holes—outcomes that compromise both safety and the finished installation.
Next, confirm that you have a stable work surface. When assembling a desk or table, set up sturdy saw horses or a solid workbench. Avoid placing delicate panels directly on the floor, where they can wobble or become scratched. Clamping large panels or frames to a workbench prevents shifting when you engage the impact drill. If the furniture part is too large for your workbench, enlist a helper or use clamps to stabilize it against a wall. Unsecured materials can move unexpectedly under the rotational force of the drill, increasing the risk of hand injuries.
Clear the floor of the workspace of debris, extension cords, or loose hardware that might cause you to trip. Plan for adequate room to move around the piece. For instance, when installing kitchen cabinets, maintain at least three feet of clearance in front to allow full range of motion for the drill and your body. When working on walls or up ladders, double-check that the ladder is on a flat, stable surface. Always maintain three points of contact on the ladder (two feet and one hand) when moving or carrying your impact drill between locations.
Lastly, temporarily secure any adjacent furniture components or parts to prevent them from shifting when you drive screws. If you are mounting a cabinet face frame, consider marking and clamping the frame into place before fastening. This approach ensures that the alignment remains consistent while you use the impact drill, reducing the need for rework and minimizing the chance of the drill biting into an unintended area.
Pre-Drilling Considerations
Pilot Holes vs. Self-Drilling Screws
Material Assessment
Fastener Selection
Bit Inspection and Replacement
Before using an impact drill, evaluate whether you need to drill pilot holes or if self-drilling screws (sometimes called self-tapping screws) are more appropriate for your furniture material. In many hardwood installations—such as oak, maple, or hickory—pre-drilling a pilot hole is essential to prevent the wood from splitting as the screw’s threads bite in. For softer woods like pine or plywood, brad-point or tapered screws explicitly designed to cut threads as they enter may work without a pilot hole, especially with an impact driver that delivers sufficient torque. However, even softwood can split if the screw diameter is large relative to the wood grain, or if the pilot hole is too small.
When installing particleboard or MDF, be cautious: these materials are notorious for splitting due to their composition. Use screws designed with wide, coarse threads that distribute pressure and reduce the likelihood of cracking. In such cases, a pilot hole may still be advisable—particularly for large-diameter screws or close-to-edge applications. A good rule of thumb is to drill a pilot hole that is 70–80% of the screw’s shaft diameter when working with MDF or particleboard.
Assess the thickness and density of the material you will drill into. For thin panels used in cabinet backs or drawer bottoms (often 1/4″ or 1/8″ plywood), using a low-torque setting or a clutch-adjustable drill/driver can prevent the drill from punching through the material too forcefully. Some impact drivers lack a clutch, so controlling pressure manually becomes essential. In such scenarios, drill a small pilot hole first and then use a screwdriver bit in the impact driver, driving slowly to avoid over-penetration.
Choose the right fastener for the task. Furniture installation often requires a variety of screws—wood screws, cabinet screws, confirmat screws (common in RTA cabinetry), machine screws with insert nuts, and specialized hinge screws. Make sure the screws are corrosion-resistant (especially for kitchen or bathroom installations) and have the correct head type (Phillips, Torx, or square drive) to match your bit. Square-drive (Robertson) or Torx screws are preferred with impact drivers because they reduce cam-out and bit slippage. Always test-fit a single screw to verify the fit, depth, and alignment before committing to a whole series of fasteners.
Inspect the drill bits or driver bits before each use. Worn or damaged bits can cause slippage, stripped screw heads, and uneven torque application. If you notice rounded edges, chipping, or bending on a bit, replace it immediately. Impact-rated bits (often labeled “impact ready” or “for impact drivers”) are designed with higher-grade steel and optimized geometry to withstand the hammering action without fracturing. Investing in a set of quality impact-rated bits from reputable brands will pay dividends in terms of durability and consistent performance.
Selecting the Right Drill and Accessories
When choosing a household electric impact drill for furniture installation, several factors come into play: battery voltage, torque rating, ergonomics, weight, battery life, and accessory compatibility. Below are detailed considerations and examples of recommended models.
Voltage and Power
Most household impact drivers fall into the 12V–20V range. Generally, a 12V model provides sufficient power for light to medium furniture tasks, such as assembling flat-pack pieces or mounting lightweight shelves. For more demanding projects—installing hardwood cabinets, driving long lag screws into studs, or assembling large bedroom sets—a 18V or 20V model gives you additional torque and runtime. For instance, a 12V impact driver might deliver around 800–1,200 in-lbs (inches-pounds) of torque, while a 18V/20V model can produce 1,400–2,000 in-lbs or more.
If your home already has a battery platform—say, Makita 18V LXT or DEWALT 20V MAX—sticking to that ecosystem can be convenient. Batteries and chargers are interchangeable among tools within the same platform, reducing clutter and overall cost. However, if you do not own any cordless tools yet, consider your long-term needs. A 20V model from a brand like Milwaukee or DEWALT may be more expensive initially but could serve as the foundation for future power tools, saving money in the long run.
Torque and Speed Settings
Impact drivers typically have a single-speed motor but may include multiple torque or speed modes (high/low) on more advanced models. Some offer electronic clutch settings that limit torque to protect delicate materials—particularly useful when working on veneers or thin panels. When selecting an impact driver, check for variable-speed triggers, which enable you to modulate torque intuitively. A model with three-speed settings (e.g., slow for precise bit insertion, medium for general driving, high for heavy-duty tasks) offers versatility and control.
Certain manufacturers incorporate digital torque adjustment, granting precise control to within a few in-lbs. For instance, professional-grade models like the Milwaukee M18 FUEL™ 2853-20 impact driver can be digitally tuned to deliver exactly the torque you need, minimizing the risk of overdriving screws. If you are a serious DIYer or a tradesperson installing custom cabinetry, this level of control can take your work from good to exceptional.
Ergonomics and Weight
Furniture installation often involves overhead or angled work—mounting cabinets or installing closet rods—so an impact driver’s weight and balance matter. Lightweight, compact models like the Makita XDT13Z (12V LXT) or DEWALT DCF777 (20V MAX) weigh around 2.3–2.8 pounds (with battery) and sit comfortably in the hand. Their slim profiles allow you to reach tight spaces inside cabinet frames or behind assembled furniture components.
If you select a heavier 18V/20V model—such as the DEWALT DCF887 (20V MAX XR) or Bosch PS41 (18V) —ensure the handle has an ergonomic grip with rubberized over-molds to reduce fatigue. Some brands place the motor in-line with the handle to maintain a shorter body length, improving balance. Others adopt a T-style design, which lowers the center of gravity, making it easier to hold horizontally when driving screws from awkward angles. Test a few models in person, if possible, or read user reviews to gauge how comfortable each feels during extended use.
Battery Life and Charging
Battery drain is a common frustration during extended installation projects. For a full day’s work on a large piece of furniture or multiple cabinets, having multiple battery packs is ideal. High-capacity batteries (e.g., 5.0Ah or 6.0Ah at 18V/20V) provide longer runtime between charges compared to compact 2.0Ah or 3.0Ah packs. However, larger batteries add weight and bulk. If the tasks involve mainly driving screws into pre-drilled holes, a smaller battery might suffice, but if you’re also drilling pilot holes or working on denser materials, the higher amp-hour ratings pay off.
Most reputable brands—DEWALT, Makita, Milwaukee, and Ryobi—offer fast chargers that can bring a depleted 5.0Ah battery to 80% capacity in around 30 minutes. If time is of the essence, a rapid charger is worth the investment. Some advanced chargers even provide battery health diagnostics, notifying you when a battery approaches the end of its service life. A healthy battery not only delivers consistent power but also reduces downtime and prevents mid-installation power loss.
Accessory Compatibility
A robust impact driver toolkit should include:
Impact-Rated Driver Bits
Nut Drivers
Socket Adapters
Drill Bit Adapters
Impact-rated driver bits are engineered to withstand the concussive forces delivered by an impact driver. Unlike regular screwdriver bits, they are made of higher-grade S2 steel or similar alloys and feature optimized geometries for better bit retention and reduced cam-out. Investing in a set of high-quality bits from brands like DeWALT, Milwaukee (“Shockwave” bits), or Bosch (“Impact Tough” bits) ensures longevity and consistent performance.
Nut drivers—often in hex sizes ranging from 1/4″ to 3/8″—enable you to fasten bolts and machine screws conveniently. This feature can prove invaluable when attaching mounting brackets or using threaded inserts in furniture panels. With a socket adapter, you can also convert your impact driver into a mini impact wrench, albeit with torque limitations. Such versatility means fewer tools to carry on-site or between rooms.
If you need to drill pilot holes in addition to driving screws, a hex-shank drill bit adapter can transform your impact driver into a drill/driver. While not as efficient for precise hole drilling as a dedicated drill/driver with a clutch, this adapter allows you to use high-speed steel (HSS) bits for quick, shallow pilot holes in softwoods or sheet goods. Ensure that the adapter is impact-rated; standard three-jaw chuck-style adapters will not hold up to the impact action and can fail catastrophically.
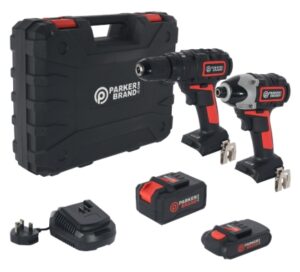
Recommended Household Electric Impact Drill Brands and Models
Selecting the right brand and model is crucial, as not all impact drivers are created equal. The following list provides a curated selection of popular household electric impact drills, suitable for furniture installation tasks. Each entry includes the brand, model number, key specifications, and commentary on why it is recommended.
DEWALT DCF887D2 (20V MAX XR Impact Driver Kit)
DEWALT’s DCF887D2 is a perennial favorite among DIYers and professionals for its blend of power, compactness, and advanced features. Offering up to 1,825 in-lbs of torque, a three-speed selector (0–1,000, 0–2,800, 0–3,250 RPM), and a brushless motor, this model drives screws into hardwood or dense engineered materials with ease. The compact 5.3-inch length allows access to tight corners behind furniture panels. The kit typically includes two 1.3Ah or 2.0Ah battery packs and a fast charger, ensuring minimal downtime.
One standout feature is its integrated LED work light with three brightness settings—ideal for working inside dark cabinets or under shelves. Additionally, DEWALT’s “XP” branded bits (included in some kits) ensure stable engagement with screw heads, reducing the chance of stripping. If you are already invested in the 20V MAX platform, the DCF887D2 slots seamlessly into your existing battery lineup.
Makita XDT13Z (12V LXT Impact Driver)
For those seeking a lighter, more maneuverable option, Makita’s XDT13Z 12V LXT model is hard to beat. Weighing just 2.3 pounds (with battery) and measuring a compact 5.9 inches in length, this driver is perfect for overhead work or tight cabinetry corners. With 1,400 in-lbs of torque delivered by a brushless motor, it can tackle most household furniture tasks, from installing drawer slides to fastening bed frames. Makita’s Rapid Optimum Charger (not included) can charge a 12V 3.0Ah battery to 80% in as little as 15 minutes, minimizing interruptions.
Makita’s LXT battery platform is known for reliability and consistent performance across a wide temperature range—an advantage if you install furniture in an unheated garage or outdoor decks. The XDT13Z lacks multiple speed settings but compensates with a variable-speed trigger that provides intuitive speed control. Its ergonomic handle with ribbed rubber over-mold reduces vibration and minimizes operator fatigue.
Milwaukee M18 Fuel 2853-20 (M18 FUEL™ ½” Impact Wrench)
While technically an impact wrench rather than a short-shaft impact driver, the Milwaukee M18 Fuel 2853-20 deserves mention for heavy-duty furniture installation tasks that involve large lag bolts or carriage bolts, such as securing 4×4 posts to heavy timber frames. With up to 1,000 ft-lbs of torque (that is 12,000 in-lbs) in a compact 6.25-inch form factor, it can drive large fasteners into studs or dense lumber effortlessly. For more typical cabinet or bookshelf installations, this model might be overkill. However, if your furniture project involves constructing a wooden pergola, bolting heavy steel frames, or assembling loft beds with structural integrity, the torque is beneficial.
Belonging to the M18 battery system, this impact wrench pairs best with high-output 5.0Ah or RedLithium™ 6.0Ah packs for extended runtime. The brushless POWERSTATE™ motor ensures longer tool life and consistent power output. Additionally, REDLINK PLUS™ electronics provide overload protection and optimized performance in extreme conditions—valuable if you work in very hot or cold environments.
Bosch PS41 (18V Impact Driver)
Bosch’s PS41 is a well-balanced, mid-range 18V impact driver offering 1,500 in-lbs of torque and a three-mode Adaptive Speed Control Technology, allowing users to select between precision driving, normal driving, and high-speed driving. In “precision” mode, the drill operates at lower RPM (0–1,150), reducing the chance of overdriving shallow-screw applications common in particleboard or thin plywood. The LED ring around the chuck provides even illumination without shadows—particularly helpful when aligning pilot holes or positioning concealed hinges in cabinetry.
At 3.18 pounds (with a 4.0Ah battery), the PS41 strikes a balance between heft and manageability. Its ergonomic handle shape and soft-grip over-mold reduce hand fatigue. If you already own Bosch’s 18V platform, this model integrates seamlessly with existing batteries and chargers. The PS41’s noise-dampening motor housing is quieter than many competitors at full throttle, which can be an advantage in indoor settings where you want to keep noise to a minimum.
Ryobi P238 (18V One+ Impact Driver Kit)
For budget-conscious DIYers, Ryobi’s P238 One+ model delivers excellent value. With up to 1,400 in-lbs of torque and a three-speed selector switch (0–1,300, 0–2,000, 0–2,800 RPM), it can handle most furniture assembly tasks without difficulty. While it may lack the durability or advanced electronics of premium brands, the P238 includes dual LED lights (above and below the bit) that significantly improve visibility in dark corners inside cabinets. The kit usually includes two 1.5Ah batteries and a charger.
Ryobi’s One+ battery platform encompasses over 175 tools, meaning that if you own or plan to expand your tool collection, you can share batteries across all devices. The P238’s ergonomics are reasonable, though some users report that extended use can cause mild fatigue due to its all-plastic housing (compared to rubber over-molds on higher-end models). For straightforward furniture assembly—such as constructing flat-pack wardrobes or bunk beds—Ryobi is a solid choice.
Black+Decker BDCDMT1206L (Corded 6.5-Amp Drill/Driver)
If you prefer not to manage batteries, a corded model like Black+Decker’s BDCDMT1206L may be appealing. While not an impact driver in the strictest sense, this corded drill/driver offers high torque and continuous power, features that enable it to drive screws securely into various materials without concern for battery life. The 6.5-amp motor delivers sufficient power for most home furniture installation tasks, especially when paired with a torque clutch that allows you to fine-tune the driving force (18+1 clutch settings).
A corded drill/driver is heavier and less compact than a cordless impact driver, but it remains a reliable backup for extended jobs—no battery downtime, no worry about losing charge halfway through installing kitchen cabinets. Just ensure you have a high-quality extension cord rated for power tools to avoid voltage drop. That said, if you frequently work in areas without convenient power outlets, the lack of portability can be a significant drawback.
Porter-Cable PCE345 (20V MAX Impact Driver)
Porter-Cable’s PCE345 is a competitively priced 20V MAX impact driver that delivers up to 1,400 in-lbs of torque. With a two-speed switch (0–1,200 and 0–2,800 RPM), it offers a good compromise between targeted precision and high-speed driving. The kit often includes a 1.5Ah battery and charger. The compact 5.4-inch length and 2.8-pound weight make it comfortable for overhead or confined-space use.
Porter-Cable tools benefit from the manufacturer’s extensive service network, which means replacement parts and batteries are generally easy to find. The PCE345’s LED work light illuminates the work surface for clear visibility, and the ergonomic handle alleviates wrist strain during long assembly sessions. The battery system is not compatible with larger Porter-Cable 20V tools (due to slight voltage differences), but many users who have multiple Porter-Cable 20V tools find it sufficient for light-to-medium furniture installation needs.
WEN 29571 (20V Cordless Impact Driver Kit)
WEN, known for affordable yet functional tools, offers the 29571 impact driver kit. With 1,600 in-lbs of torque and a brushless motor, this model competes with more established brands in terms of raw performance. The two-speed gearbox (0–1,500 and 0–2,800 RPM) provides versatility, and the kit often includes two 2.0Ah batteries, a charger, and a set of impact-rated bits. While WEN’s service network is smaller than the “big names,” many users report satisfactory longevity for light to moderate usage.
This model’s ergonomic design incorporates a rubber over-mold handle to enhance grip. The absence of advanced electronics like torque control means that aftermarket clutch attachments may be necessary if you need fine control when working on thin veneer panels. For most straightforward cabinet or shelf installations, however, the WEN 29571 is a budget-friendly way to access near-professional torque levels.
COMMON ACCESSORIES FOR FURNITURE INSTALLATION
Woodworking Clamps
Magnetic Bit Holders
Countersink Bits
Step Drill Bits
Threaded Inserts and Installation Tools
Woodworking clamps are indispensable for securing furniture parts at right angles or holding pieces together while you drive screws. Bar clamps or parallel clamps ensure uniform pressure across panel edges, preventing shifting as the impact driver sets fasteners. For example, when installing a kitchen cabinet face frame, using two parallel clamps—one at the top and one at the bottom—holds the frame flush against the carcass, guaranteeing consistent screw alignment.
Magnetic bit holders or quick-change hex bit extensions increase the reach of your impact driver. When fastening the back panel inside a deep bookcase, a 2-inch magnetic extension holds the bit securely and allows you to drive screws at oblique angles without fumbling. Ensure that any extension or bit holder you use is rated for impact drivers; standard hex bit holders can break under high-impact force.
Countersink bits prevent screw heads from protruding above the wood surface. After drilling a pilot hole, use a countersink bit to create a shallow recess for the screw head, producing a clean, flush finish. For hardwood cabinet doors, countersinking ensures that screws do not bulge the veneer, preserving a seamless appearance. Many countersink bit sets include multiple diameters; choose one that matches your screw’s head size.
Step drill bits—though more commonly associated with metal work—can come in handy when you need to enlarge an existing hole in thin metal brackets or plastic furniture connectors. For instance, if a pre-drilled hole in a steel bracket does not match your screw diameter exactly, a step drill can enlarge the hole smoothly without causing jagged edges. Use these with caution; because step bits produce heat quickly, work in short increments and apply cutting fluid or water to keep the bit cool.
Threaded inserts and their installation tools enable you to add metal threads to particleboard or MDF—materials that otherwise do not hold machine screws well. For installing heavy furniture components—like a top-shelf support bracket—using threaded inserts in the cabinet’s side walls allows you to attach cross-members or decorative trim with machine screws. Installation involves drilling an appropriate pilot hole, using an impact driver with an insert installation bit (often a hex head) to spin the insert into the board until flush with the surface. Once installed, the metal insert can accept machine screws repeatedly without stripping, facilitating future disassembly or reconfigurations.
Step-by-Step Guide to Using an Electric Impact Drill for Furniture Installation
Step 1: Plan and Layout
Before you pull out the impact driver, carefully plan the installation. Study the furniture’s assembly instructions—or, if you are creating custom built-ins—draft a detailed plan with measurements. Identify the locations of each screw, bracket, hinge, and support. Use a pencil to mark pilot-hole positions on panels, walls, or mounting surfaces. Check for studs or obstacles behind walls (if mounting cabinets or shelves) using a stud finder, and locate them clearly with painter’s tape or small adhesive labels.
Having a physical layout ensures that you do not misplace holes or fasteners, reducing the risk of unwanted screw placement that can compromise structural integrity or aesthetics. For example, if you overlay cabinet face frames after mounting the carcass to wall studs, not marking the studs’ positions could lead you to drill screws into open drywall instead of studs, creating a weak installation prone to sagging or failure.
Step 2: Select and Prepare Fasteners
Choose screws that match your material and application. For attaching face frames to case sides, use 1-¼” or 1-½” fine-thread cabinet screws in 8 or 10 gauge. If you are installing shelf supports in a ¾” plywood cabinet, ⅝” Apple-ply nails or 1″ #6 screws suffice. Always confirm lengths, thread types, and head styles. Before starting, organize your fasteners in labeled containers or a parts tray—keeping wood screws, confirmat screws, hinge screws, and specialty fasteners separate prevents confusion mid-project.
If pilot holes are necessary, select a drill bit that is approximately 75% of the screw’s shank diameter for hardwoods, or 85% for softwoods and MDF. For example, a #8 screw typically has a 0.164″ shank—use a 5/32″ drill bit (0.156″) for oak or mahogany, or a 3/32″ bit (0.094″) for pine. When working on high-end furniture with cherry or walnut veneers, opting for a smaller pilot hole and driving the screw slowly minimizes splitting and keeps the veneer from chipping around the hole. Place scrap wood beneath panels to prevent breakout on the exit side when drilling pilot holes.
Step 3: Fit the Correct Driver Bit
Match the bit to the screw head. Torx (T15, T20), square-drive (Robertson #1, #2), and Phillips (#2) bits are common in furniture hardware. Torx and Robertson bits reduce cam-out more effectively than Phillips, which is why many cabinet hardware and European connectors (e.g., Euro screws) use these head types. Insert the driver bit fully into the impact driver’s quick-change chuck until it clicks. Tug gently on the bit to verify it is securely seated. Impact drivers lack the friction-based bit retention of a drill/driver, so the detent ball system in an impact driver’s chuck is essential for holding the bit during high-torque operations.
If you encounter a damaged or rounded screw head, use a screw extractor bit designed for impact drivers. These bits usually have a reverse spiral design that bites into the damaged head as you apply torque, allowing the screw to back out. However, avoid using extractor bits in delicate veneer surfaces; first, remove any loose material around the screw head with a utility knife to prevent splintering.
Step 4: Adjust Speed and Torque Settings
If your impact driver has multiple speed or torque modes, select the appropriate setting based on the task. For driving small hinge screws into thin material, use a low-torque or low-speed setting to prevent overdriving and stripping the hinge. Conversely, for driving long cabinet screws into studs, switch to high torque or high speed. Some premium models (e.g., DEWALT DCF887) feature an electronic brake that stops bit rotation instantly when you release the trigger—use this feature to prevent the final click of the impact mechanism from denting the furniture surface.
If your model lacks clutch settings (common in basic impact drivers), practice controlling torque by gradually applying pressure and easing off the trigger as the screw nears flush. This technique takes time to master but prevents overdriving and ensures consistent installation quality. Experts often recommend performing a test on a scrap piece of identical material: drive a screw fully and inspect for splitting or countersinking depth. Adjust your technique accordingly before moving to the actual furniture part.
Step 5: Drive Screws Smoothly
Position the impact driver’s bit into the screw head at a 90-degree angle to the surface. Maintaining a perpendicular orientation prevents the bit from camming out or the screw from entering at an angle, which can misalign panels or cause binding in drawer slides. Start the impact driver at low speed to engage the threads, and once the screw bites into the material, gradually increase pressure or switch to higher speed mode, allowing the impact mechanism to deliver full torque.
As the screw approaches the desired depth, ease off the trigger slightly to reduce torque. If your driver has an LED indicator that lights up when the screw is flush, watch for that signal. For more advanced models with adjustable torque, the driver will stop applying impact force once it senses the preset torque threshold. Frequently inspect countersunk areas to ensure screws sit flush or slightly recessed, depending on whether you plan to fill and cover the holes.
Step 6: Remove Stripped or Over-Driven Screws
Despite your best efforts, you may occasionally encounter a stripped screw or one that has been driven too deep. To remove a stripped screw, first try using a Torx or Robertson bit that can engage any remaining bit depths. If that fails, switch to an extractor bit designed for impact drivers. Insert the extractor bit into the driver, align it with the damaged screw head, and run the impact driver in reverse at a low speed. The extractor’s reverse flutes should bite into the screw head and back it out.
For over-driven screws that have sunk too far below the surface, use a countersink bit in reverse (if your impact driver has a reverse mode) or switch to a corded drill/driver with a clutch. Place a small wood shim or backing piece behind the hole, and engage the screw head by gently prying upward while running the drill in reverse at low RPM. Once the head emerges slightly, you can grip it with needle-nose pliers and finish removal manually. Fill the resulting hole with wood filler or a small dowel if you plan to reuse the location.
Step 7: Fine-Tune Attachments and Alignment
After the primary fasteners are installed, step back and inspect for alignment issues. Doors, drawers, and cabinet faces should be level and flush. Use a digital level or laser level to verify horizontal and vertical planes. If a section is slightly askew, loosen the screws, realign, and re-tighten using the impact driver in “reverse” to release tension, then “forward” to seat the screws in the correct position. Be mindful that repeated adjustments can enlarge pilot holes over time, especially in softwood; if the hole has become loose, consider inserting a wooden toothpick or dowel coated with wood glue to fill the gap, then redrill a pilot hole before reinserting the screw.
For mounting long rails—such as wardrobe hanging rods—use a long spirit level to ensure straightness before fastening all mounting brackets. Secure one end bracket first, place the rail, measure the opposite bracket position, pre-drill a pilot hole, and then attach. Once both ends are attached, drive the central screws to stabilize the rail. If you are working on adjustable shelves, use shelf-track systems or specialized clips to allow height adjustments; do not rigidly screw shelf pins into place unless the module is guaranteed to remain unchanged.
Step 8: Final Inspection and Touch-Ups
Once all screws are installed, thoroughly inspect each fastener head for flushness and security. Check hinges for smooth operation and adjust them if necessary—some European hinges have adjustment screws that allow fine-tuning in three dimensions. Examine drawer slides: they should glide smoothly without binding or sagging. If you notice misalignment, loosen the mounting hardware, realign using a level or square, and re-tighten with the impact driver on a lower torque setting to avoid overtightening.
Clean the workspace of wood chips, metal shavings, or dust before applying finishes or moving the furniture into its final position. Use tack cloths or a vacuum to remove micro-debris. If any screws are slightly protruding or have damaged the veneer, use a flush-cut saw or oscillating tool to remove the excess, then apply a wood filler or veneer patch kit. After paint or finish, ensure all painted surfaces are fully dry before final assembly to prevent smudges or ink transfer.
Maintenance and Care of Your Impact Drill
Battery Maintenance
Proper Charging Practices
Storage Conditions
Routine Inspection
Maintaining the battery is essential for consistent impact driver performance. Lithium-ion batteries degrade over time, especially if stored in extreme temperatures. Always charge batteries at room temperature (around 20°C/68°F). Avoid charging below freezing (0°C/32°F) or above 40°C/104°F, as this can permanently reduce capacity. If you live in a region with cold winters—such as Toronto, where temperatures can dip below −10°C/14°F—store batteries indoors.
Do not leave batteries on the charger once they are fully charged; remove them to prevent trickle charge, which can stress cells over long periods. Many modern chargers automatically cut off when charging is complete, but if yours does not, develop a habit of unplugging or removing the battery when the LED indicates full charge. If you have an array of 5.0Ah or larger batteries, cycle them periodically—using them for a full work session before recharging—to recalibrate the internal battery management system.
During active seasons, inspect batteries monthly for any swelling, deformation, or cracked casings. If you notice physical damage or a battery that becomes abnormally hot during charging or use, retire it immediately. Dispose of lithium-ion batteries responsibly at dedicated recycling centers—never in household trash.
Tool Cleaning and Inspection
After each furniture installation project, wipe down the impact driver with a clean, dry cloth to remove dust, wood chips, or grease. Inspect vents to ensure they are free of debris, which can cause motor overheating. If you operate in particularly dusty environments (e.g., sanding between paint layers), use compressed air—no higher than 30 psi—to blow out accumulated dust from vents and crevices. Avoid using solvents on plastic housings; a lightly damp cloth with mild soap is sufficient for tougher grime.
Periodically examine the hex chuck mechanism for signs of wear or looseness. A failing chuck can cause bits to wobble under load, increasing the risk of cam-out and injury. If the quick-change chuck no longer holds bits securely—even brand-new impact bits—consider replacing the chuck assembly. Many manufacturers sell replacement chucks that can be installed with minimal disassembly, often requiring only a few hex or Torx screws.
Lubricate moving parts—such as the chuck’s internal sliding components—with a small drop of light machine oil once or twice a year, especially if you live in a humid environment where rust can form. Avoid over-lubrication; too much oil can attract dust and wood particles, causing the chuck to stick. Apply a small amount, cycle the chuck open and closed several times, then wipe away any excess.
Bit and Accessory Care
Impact-rated bits endure high stress, and over time, they will dull or chip. Routinely inspect bits for rounded edges, cracks, or burrs. A damaged bit not only compromises performance but can also slip out and damage your screw heads or cabinet veneers. When bits show visible wear, replace them. High-quality bit sets typically come in carrying cases with labeled slots to keep them organized and protected when not in use.
Socket adapters and nut drivers also require periodic inspection. Look for cracks around the hex shank or deformities in the socket end. Under heavy torque, an unseen stress fracture can cause catastrophic failure—e.g., the adapter shearing off inside the socket, leaving the bolt head spinning freely. Replace any accessory showing stress marks or splitting.
Countersink bits and drill bits should be sharpened or replaced when they no longer produce clean, consistent holes. Dull countersink bits can tear wood fiber, producing ragged holes that compromise screw seating. Use a countersink sharpening jig or a bench grinder (set to low speed) with caution, following the manufacturer’s recommendations. If you are uncertain about maintaining bits yourself, many hardware stores or tool service centers offer sharpening services at nominal fees.
Common Mistakes to Avoid
Driving Screws Without Pilot Holes in Dense Materials
Failing to drill pilot holes when working with hardwoods like oak, birch, or mahogany often leads to splitting, cracked edges, or misaligned fasteners. In furniture installation, aesthetics matter: a visible split along a tabletop edge or cabinet panel can ruin the final appearance. Always confirm material density and drill a pilot hole when in doubt. The slight extra time spent drilling pays dividends in a professional-looking result.
Using the Wrong Bit Type or Worn Bits
Attempting to drive Torx screws with a Phillips bit or reusing a rounded bit leads to cam-out, stripped screws, and wasted effort. Ensure you have the correct bit type—Torx T20 for cam lock connectors in flat-pack furniture, Phillips #2 for most hinge screws, or square-drive #1 for specialized hardware. Keep your bits organized in a labeled case. At the first sign of wear (rounded corners, chipped edges), discard the bit to protect your fasteners and surfaces.
Over-Driving Screws into Veneer or Laminate Surfaces
Laminate and veneered boards (common in ready-to-assemble furniture) can crack or chip if screws are driven too deep or too quickly. Use a countersink bit or a torque-limited setting to prevent the screw head from punching through the thin decorative layer. If your impact driver lacks a torque adjustment, remove the battery when running the final few millimeters of screw depth and switch to a manual screwdriver to seat the screw flush. While this step may lengthen the process, it ensures a clean finish.
Ignoring Manufacturer’s Instructions and Hardware Specifications
Guarantees and warranties on furniture often require you to follow specific installation instructions. Using incorrect fasteners, skipping recommended brackets, or substituting screw sizes can void warranties and compromise structural integrity. Carefully read the assembly manual or manufacturer’s guidelines before starting. If you need to modify hardware—say, using longer screws for thicker panels—consult the manufacturer or a hardware specialist to confirm compatibility.
Applying Excessive Torque on Thin Metal Brackets or Plastic Fittings
Some furniture connectors—particularly in budget flat-pack systems—include thin metal angle brackets or plastic cam lock fittings. Driving screws with full impact force can deform or crack these connectors. In such cases, drill small pilot holes and set the impact driver to its lowest torque range. In extreme caution scenarios, use a manual screwdriver or a drill/driver with a clutch to finish the last quarter turn, ensuring the connector remains undamaged.
Recommended Brands and Models: Detailed Introductions
Below is an expanded discussion of each previously listed brand and model. We provide additional context regarding performance characteristics, accessory compatibility, user feedback, and scenarios in which they excel or show limitations. Each subsection is structured with a clear list title (in bold) followed by rich paragraphs that thoroughly describe the model.
DEWALT DCF887D2 (20V MAX XR Impact Driver Kit)
One of the standout features of the DEWALT DCF887D2 is its brushless motor, which enhances efficiency by reducing friction and heat generation. Compared to brushed models, brushless motors can deliver up to 50% longer runtime per battery charge and typically boast a longer operational lifespan due to the absence of carbon brushes. With a maximum torque output of 1,825 in-lbs, the DCF887D2 is more than capable of driving long structural screws into oak or into wall studs—an essential attribute for installing heavy-duty shelves or upper-level kitchen cabinets.
DEWALT’s three-speed selector switch (rated at 0–1,000, 0–2,800, and 0–3,250 RPM) offers users precise control over speed and torque. For delicate assembly tasks—such as fastening small decorative trim—selecting the lowest speed mode allows for smooth, controlled insertion without risking veneer cracking. Conversely, the highest speed mode is perfect for rapidly driving screws into pre-drilled holes in softwood or MDF, speeding up flat-pack furniture assembly. The middle mode provides a balanced approach—useful for general-purpose drilling and driving tasks.
The kit generally includes two 1.3Ah or 2.0Ah XR batteries and a charger that can fully replenish a 2.0Ah pack in roughly 30 minutes. While the 1.3Ah packs keep the package light and enhance maneuverability for overhead work, serious users often upgrade to 5.0Ah or 6.0Ah batteries on the same 20V MAX platform for extended runtime. The impact driver’s compact 5.3-inch length (from front of chuck to back of handle) allows access into tight cabinetry corners, behind existing fixtures, or beneath low overhangs, where larger tools wouldn’t fit. At 3.4 pounds with a 2.0Ah battery attached, it sits comfortably in the hand for extended sessions without causing excessive wrist strain.
User Feedback and Observations
Users frequently praise the DCF887D2’s long battery life and speedy charging times. Many note that the impact driver can drive dozens of 2½” cabinet screws into hardwood without recharging—an invaluable feature for kitchen remodelers or furniture installers tackling multiple units in one day. The three-speed selector is lauded for its responsiveness; however, some beginners report occasional confusion when switching speeds under load, emphasizing the importance of familiarizing oneself with the tool’s settings before tackling a major project.
Some users have recommended pairing the DCF887D2 with workflow enhancements such as belt-mounted bit holders to keep extra bits on hand, allowing quick swaps between Phillips, Torx, and square-drive bits. Additionally, using a DEWALT magnetic belt hook enables users to temporarily hang the driver on a ladder rung or cabinet frame when repositioning parts—highlighting DEWALT’s consideration of real-world installation scenarios.
Makita XDT13Z (12V LXT Impact Driver)
Makita’s XDT13Z offers a compelling blend of size, weight, and power. Despite its 12V platform, it delivers 1,400 in-lbs of torque—comparable to many mid-range 18V competitors—making it highly effective for typical furniture assembly tasks. The brushless motor not only conserves battery power but also provides greater responsiveness under sudden load changes, ensuring that the bit remains seated in the screw head and minimizing slippage.
An intriguing feature of the XDT13Z is its “Active Feedback-sensing Technology (AFT).” This technology detects sudden rotational torque reactions—such as when the bit binds or the screw head jams—and automatically shuts down the motor to prevent further torque delivery, thus protecting both the user and the tool. In furniture installations involving hidden corners or inside cabinets where repositioning the tool mid-screw isn’t straightforward, AFT provides an additional safety net against accidents.
The impact driver’s two-speed selector (0–1,500 and 0–3,000 RPM) and single-mode operation are straightforward, minimizing confusion for users who prefer simplicity. Its compact 5.9-inch form factor and 2.3-pound weight (with a 2.0Ah battery) make it particularly suited to prolonged overhead tasks—such as installing crown molding on a bookcase or securing upper-level cabinets. The narrow rubber over-mold grip reduces slip, allowing you to maintain control even when wearing work gloves or when your hands are sweaty from labor-intensive assembly.
User Feedback and Observations
Users consistently praise the XDT13Z for its reliability in tight spaces—cabinet interiors, corners behind fridge panels, or within drawer compartments. Some note that the 12V battery may not last as long for continuous high-torque tasks when compared to 18V alternatives; therefore, purchasing an extra battery pack is advisable if you plan extended sessions. The quick-charging feature with Makita’s Rapid Optimum Charger (XC04) means that downtime between battery swaps is minimal.
Notably, users appreciate Makita’s ecosystem: batteries from the XGT series, 18V LXT series, and the 12V LXT series share a charging platform—meaning clarity on charging status across multiple battery types. The XDT13Z’s AFT feature has prevented numerous potential accidents according to reports—particularly among hobbyists who occasionally slip when driving screws at odd angles in cabinets—underscoring Makita’s focus on user safety.
Milwaukee M18 Fuel 2853-20 (M18 FUEL™ ½” Impact Wrench)
Although functionally different from a typical household impact driver, the Milwaukee M18 Fuel 2853-20 (commonly called an impact wrench) deserves special mention for heavy-duty furniture installations requiring large fasteners and structural connections. For instance, if you are assembling a custom loft bed with ½” carriage bolts that anchor into 4×4 posts, a standard impact driver cannot generate the torque needed (commonly around 300 ft-lbs or 3,600 in-lbs). The M18 Fuel 2853-20 can produce up to 1,000 ft-lbs (12,000 in-lbs), enabling you to torque carriage bolts, lag screws, or structural eye bolts with ease.
Powered by Milwaukee’s brushless POWERSTATE™ motor, this impact wrench maximizes energy efficiency: more of the battery’s stored energy is converted into usable torque rather than heat. The integrated REDLINK PLUS™ intelligence system monitors tool, battery, and charger communication in real time, protecting against overload, overheating, and over-discharge. This feature is invaluable when working in extreme temperatures—such as uninsulated garages that dip below freezing in winter or attic installations during summer heat.
At 6.25 inches in length with a 3.8-pound weight (bare tool) or roughly 5.5 pounds with a 5.0Ah battery, the tool is surprisingly compact for its torque capability. The rubberized over-mold handle enhances comfort during prolonged use, and the three-speed selection (0–550, 0–1,200, 0–1,900 RPM) grants fine control when you need to start a bolt in a hole gently or crank down a nut forcefully. The half-inch hog ring anvil holds sockets tightly without a retaining ring, facilitating rapid socket changes when switching between different bolt sizes—an advantage when installing multiple sizes of fasteners in a large furniture piece.
User Feedback and Observations
Users installing large structural wardrobe frames or outdoor furniture frames often cite the M18 Fuel 2853-20 as a lifesaver due to its ability to remove old lag screws from rough wooden posts without stalling. While its price tag places it in the professional category, many homeowners who build custom decks or timber frames find the investment worthwhile. Some hobbyists note that the blow-out ring on the anvil can occasionally be tricky to manipulate with gloved hands when changing sockets; therefore, keeping one set of sockets permanently attached can speed up repetitive tasks.
Because it is an impact wrench, it does not have a built-in clutch for fine torque control common in impact drivers. This absence makes it less ideal for delicate furniture assembly tasks where you could tear through thin plywood or veneer. Many users pair this tool with a smaller impact driver—such as the XDT13Z or DCF887—to handle the bulk of screw-driving, reserving the 2853-20 for large bolts, nuts, or stubborn fasteners.
Bosch PS41 (18V Impact Driver)
The Bosch PS41’s unique selling point is its Adaptive Speed Control Technology, which provides three modes that enhance precision, control, and speed. In “Precision Mode,” the tool operates at a maximum of 1,150 RPM with significantly reduced torque—ideal for tasks like installing decorative face frames or light-duty hardware where the last thing you want is to crank down a screw too far. “Normal Mode” unlocks up to 2,200 RPM, suitable for general furniture assembly tasks such as driving 1-½” wood screws into cabinet frames. “Turbo Mode” unleashes the full 1,500 in-lbs of torque at 3,000 RPM for more demanding tasks, like tightening lag screws for mounting heavy benches or large shelving units.
The integrated LED ring around the chuck provides even illumination—eliminating shadows that often occur when a single LED is positioned offset from the bit. This 360-degree illumination is particularly beneficial when working inside tall cabinets, under deep shelves, or in poorly lit closets. The PS41’s adapter ring can also connect to a variety of accessory guides—such as offset guides for driving screws close to edges without sliding off—making it extremely versatile for furniture installation tasks that require precision.
At a balanced 3.18 pounds (with a 4.0Ah battery), the PS41 maintains stability in the hand, reducing wrist fatigue during prolonged use. The rubber over-mold and ergonomic grip contribute to secure handling, even in colder environments where hands might be gloved. Bosch’s 18V battery platform—now branded as “18V CORE18V” for premium packs—offers both 4.0Ah and 6.0Ah options with advanced cell chemistry for increased performance and longevity.
User Feedback and Observations
Many users comment on how the three-mode selection addresses specific scenarios during furniture installation—Precision Mode for final sink depth adjustments, Normal Mode for everyday driving tasks, and Turbo Mode for heavy-duty operations. Some beginners find switching between modes under load slightly confusing at first, but user manuals clearly outline the sequence. The LED ring gets consistent praise for eliminating blind spots, especially when affixing corner braces inside cabinet boxes or working beneath overhangs.
One drawback noted is that the PS41’s charging ecosystem uses slightly different battery interfaces for its premium CORE18V line versus legacy 18V batteries, which can confuse users who own multiple Bosch tools. Additionally, the PS41, while powerful, can be priced higher than comparable models from other brands—so its appeal often hinges on Bosch lineup loyalty or the need for Adaptive Speed Control.
Ryobi P238 (18V One+ Impact Driver Kit)
The Ryobi P238 highlights the democratization of power tools—bringing many features of professional-grade impact drivers to a budget-friendly platform. With 1,400 in-lbs of torque and a three-speed selector, it can tackle most furniture assembly tasks typically encountered by homeowners. The kit usually includes two 1.5Ah batteries that, while not as long-lasting as 4.0 or 6.0Ah packs, suffice for smaller installations—such as assembling a bookshelf or mounting floating shelves. A rapid charger is often included, which replenishes a 1.5Ah pack in about 60 minutes.
Ryobi’s P238 features dual LEDs—one positioned above the bit and one below—which cast light both forward and backward, significantly improving visibility when working inside deep cabinets or under countertops. The ergonomic handle boasts a rubberized over-mold to enhance grip and reduce vibration. Additionally, the P238’s two-finger trigger provides a wider range of speed control as you gradually apply pressure, allowing you to sense when the screw has engaged the material before applying full throttle.
Because the P238 is part of Ryobi’s expansive One+ lineup, batteries are interchangeable among over 175 tools. If you plan to build out a versatile home workshop—adding tools like a circular saw, jigsaw, or oscillating multi-tool—the cost savings of a unified battery platform become substantial. Although the P238’s plastic housing is lighter and may feel less “premium” than the metal-reinforced bodies of more expensive brands, many users do not notice significant performance or durability issues for standard DIY tasks.
User Feedback and Observations
Many DIYers praise the P238 for its affordability and versatility—highlighting that it can drive 2″ cabinet screws into oak without difficulty. Some professional carpenters and furniture installers, however, note that the rubber over-mold can wear prematurely with heavy use and that the plastic housing may develop slight flex under high torque. In such cases, upgrading to a mid-range model like the Porter-Cable PCE345 or DEWALT DCF887D2 becomes worthwhile for daily, heavy-duty use.
Ryobi also offers a 4.0Ah or 5.0Ah battery option for users seeking extended runtime—though these packs are heavier and bulkier. The P238’s LED system, battery compatibility, and price point make it a sensible choice for homeowners who rarely drive screws larger than 2½” and do not require professional-grade electronics or brushless motor longevity.
Black+Decker BDCDMT1206L (Corded 6.5-Amp Drill/Driver)
Though not a dedicated impact driver, the BDCDMT1206L remains a solid corded alternative for furniture assembly if you work near power outlets and prefer consistent torque without battery concerns. Its 6.5-amp motor generates approximately 800–1,000 in-lbs of torque—comparable to lower-end cordless models—allowing you to drive screws into various wood types. The multi-function clutch has 18 torque settings plus a drill mode, enabling fine control for countersinking screws or performing light drilling tasks.
Operating a corded drill/driver eliminates concerns about battery life or carrying multiple battery packs. For large projects—such as installing wall-mounted storage systems across several rooms—this model can run indefinitely, as long as you have an extension cord and access to power outlets. The 10-foot cord offers decent reach for most residential settings; however, keep in mind that longer extension cords can cause voltage drop, resulting in diminished power. Use a heavy-duty 12-gauge extension cord rated for power tools if you must extend beyond 25 feet.
At 4.8 pounds (tool-only), the BDCDMT1206L is heavier than most compact impact drivers. However, its center-of-gravity remains close to the handle, which helps reduce wrist strain. The textured grip handle enhances comfort, though operating a tool with a cord can cause occasional snagging on furniture corners or obstacles. If you frequently reconfigure work areas—shifting from living room to basement—this factor can become a time-consuming nuisance.
User Feedback and Observations
Users who install built-in units or large furniture pieces in a controlled environment—like a dedicated workshop—enjoy the BDCDMT1206L’s steady power and infinite runtime. Some homeowners, however, find that the lack of percussive action (impact) means more effort is required to drive screws into hardwood. In those cases, switching to impact-rated bits or using a smaller pilot hole can compensate for the absence of impact force. Nonetheless, for lighter furniture assembly—bed frames, desks, or lightweight cabinets—the corded drill/driver remains a capable, budget-friendly tool.
Porter-Cable PCE345 (20V MAX Impact Driver)
Porter-Cable’s PCE345 balances cost and performance, delivering 1,400 in-lbs of torque and a two-speed gearbox (0–1,200, 0–2,800 RPM). The model is part of the manufacturer’s 20V MAX lineup, but note that its battery interface differs slightly from larger Porter-Cable 20V tools—meaning you cannot interchange batteries between this impact driver and their circular saws or reciprocating saws. Nonetheless, if you acquire multiple PCE345 units, batteries and chargers remain compatible within that subset.
The PCE345’s ergonomic handle provides a comfortable two-finger trigger, allowing for precise speed control. The LED work light is positioned just above the chuck, offering direct illumination of the work area. For furniture installation—particularly when aligning dowels or driving pocket-hole screws in a cabinet carcass—the LED placement casts minimal shadows, aiding accuracy. The tool’s 5.4-inch length and 2.8-pound weight (with a 1.5Ah battery) enable access to cramped spaces behind assembled furniture frames—an advantage when retrofitting an existing built-in bookshelf without removing shelves entirely.
One potential drawback is the absence of a brushless motor. While the PCE345’s brushed motor performs admirably for occasional use, it may exhibit shorter motor life and reduced efficiency compared to brushless alternatives. If you plan to undertake heavy, repeated furniture installations—such as for a leasing company or frequent rental turnovers—investing in a brushless model may yield long-term savings. However, for seasonal or hobbyist use, the PCE345 remains a solid contender.
User Feedback and Observations
Users remark that the PCE345 offers reliable performance when driving screws into softwoods and moderate performance with hardwoods—especially when paired with high-quality impact bits. Some note that battery life is shorter than that of premium brands’ 2.0Ah packs, necessitating extra batteries for extended sessions. On the positive side, the PCE345 excels at tasks like assembling flat-pack furniture, mounting lightweight wall shelves, and installing drawer slides—making it an economical option for homeowners and beginners.
WEN 29571 (20V Cordless Impact Driver Kit)
WEN’s 29571 model targets users who want brushless performance on a budget. With 1,600 in-lbs of torque and a brushless motor, it edges out some mid-level competitors in raw power. The two-speed gearbox (0–1,500, 0–2,800 RPM) strikes a balance between controlled slow-speed driving and brisk high-speed fastening. The standard kit includes two 2.0Ah batteries, a charger, and several impact-rated bits—providing a comprehensive starter set for furniture installation.
The 29571’s 5.5-inch length and 2.9-pound weight (with battery) make it competitive with other compact 20V models. The rubber over-mold handle reduces vibration, and the dual LEDs (one above and one below the bit) enhance visibility in tight spaces. WEN’s batteries feature a straightforward LED indicator showing charge levels in 25% increments—enough information to gauge when a battery swap is necessary. The tool’s digital torque control allows you to cycle through four torque settings—150, 300, 500, and 1,600 in-lbs—by pressing a button on the back of the driver. This level of control is rare in budget models and helps protect veneer or laminate surfaces from over-torquing.
User Feedback and Observations
Many first-time buyers are pleasantly surprised by the brushless motor’s performance in the 29571, noting that it drives screws into hardwood fences or large floorboards without stalling. Some users highlight that the onboard torque settings sometimes require multiple button presses to cycle through, which can slow down workflow when switching frequently. Others appreciate the torque presets for installing delicate furniture accents—such as driving small brass screws into veneered display cases—demonstrating that even budget tools can incorporate useful advanced features.
On the downside, WEN’s service and warranty network is more limited compared to larger brands. If you live in a remote area, obtaining replacement parts or arranging repairs may take longer. Additionally, while the included 2.0Ah batteries are serviceable, serious installers often upgrade to higher amplitude packs from other brands with compatible physical dimensions—though minor voltage differences can arise, so compatibility is not guaranteed.
Maintenance Checklist for Impact Drills
Clean and Inspect After Each Use
Lubricate Moving Parts Semi-Annually
Rotate Batteries Monthly
Replace Worn Bits Promptly
Store in a Dry, Temperature-Controlled Environment
After finishing a furniture installation job, take a few minutes to inspect your impact drill. Wipe away wood dust, metal filings, or grime from the housing and vents. Check for loose screws on the body or handle, and tighten them if necessary. If you notice any unusual play in the chuck, consider servicing or replacing the chuck assembly.
Every six months (or more frequently if used daily), apply a drop or two of light machine oil to moving parts—especially the inner surfaces of the quick-change chuck. Cycle the chuck open and closed several times to distribute the lubricant, then wipe away excess oil. This practice prevents rust, ensures smooth bit changes, and prolongs the lifespan of the retention mechanism.
Rotate battery packs at least once a month. If you have multiple batteries, avoid using the same one for every job. Cycling ensures that no single battery remains in a high state of charge for extended periods, which can degrade lithium-ion cells. Use all batteries equally—discharge them into tools, then recharge fully before returning them to storage.
Keep a close eye on your bit inventory. When bits show signs of wear—rounded edges, burrs, or minor fractures—remove them from service. A worn bit not only performs poorly but also increases the risk of damaging furniture surfaces. Store bits in labeled, dedicated compartments arranged by type (Torx, square drive, Phillips) to avoid confusion.
When not in use, store your impact drill and batteries in a dry, temperature-controlled environment—ideally between 10°C (50°F) and 25°C (77°F). Avoid areas prone to extreme heat or cold, such as uninsulated garages or outdoor sheds. Excessive heat can accelerate battery cell degradation, while freezing temperatures can reduce battery performance and cause condensation inside the tool. A dedicated tool cabinet or shelf in a heated workshop is optimal.
Common Furniture Installation Scenarios and Tips
Assembling Ready-to-Assemble (RTA) Cabinets
Most RTA cabinets use cam lock connectors, dowels, confirmat screws, and sometimes glue. Impact drivers excel at setting confirmat screws—long, coarse-thread screws designed for particleboard and MDF. Use a 5/16″ hex driver bit or a 6mm hex bit to drive confirmat screws at low speed. Pre-drill pilot holes using a confirmat bit to ensure snug threaded entry. When aligning cabinet panels, clamp them squarely before driving confirmat screws to avoid skewed assemblies.
Cam lock connectors require a 5mm or 3/8″ hex bit. Engage the cam lock by inserting the dowel into its corresponding hole in the panel, position the cam socket over the dowel’s protruding end, and drive the cam with the impact driver on low torque. Because cam connectors can strip easily if overtightened, set your driver to its lowest torque setting and drive slowly, stopping as soon as resistance increases significantly. Overdriving can cause the cam housing to fracture or become misaligned, compromising the structural integrity of the cabinet.
When installing hinges on cabinet doors, use self-centering drill bits or hinge jig templates to ensure precise placement. After drilling the 35mm hinge cup hole, drive hinge screws with a Torx T20 bit on a low-speed mode, ensuring minimal protrusion beyond the bore’s face—this prevents hinge binding and misalignment. Always dry-fit door assemblies— without glue or fasteners—before final tightening with the impact driver to confirm alignment and clearances.
Mounting Wall Cabinets and Shelves
Locating wall studs is the first critical step. Use a stud finder or tap on the wall to find solid spots and confirm with a small pilot hole. Mark stud locations at the top and bottom of the intended cabinet area. After leveling the cabinet’s face frame, clamp a ledger board to the studs to support the cabinet’s weight during fastening. Use 3″ to 3½” cabinet screws (coarse thread for 2×4 studs) and an impact driver on high torque mode to drive screws through the cabinet’s back rail into the studs. Drill pilot holes with a 3/16″ bit to facilitate smooth insertion, especially through thick rails or ¾” cabinet backs.
If cabinets are installed under soffits or overhangs, tilt the cabinet slightly upward before fastening the top rail. Once the top screws secure into the studs, lift the bottom to meet the countertop or floor reference and drive bottom screws. For double-stacked cabinets, begin with the base cabinets, ensure they are level, then build the wall cabinets in place, and finally stack the second-tier wall cabinets. Always use bumper blocks or shims between stacked units to maintain consistent gaps and prevent shifting during installation.
Floating shelves use hidden brackets or floating shelf hardware, requiring precise drilling into studs. After locating studs, select a floating shelf bracket rated for the load. Drill a pilot hole slightly smaller than the bracket’s hanger rod diameter using a long, slim bit. Insert the bracket flush into the wall and drive screws through the bracket’s base plate into the stud. Slide the shelf over the bracket and secure with small set screws on the underside—drive these carefully to avoid splitting the shelf’s material. Use an impact driver on low torque or finish with a manual screwdriver to maintain control.
Installing Drawer Slides and Closet Systems
When installing drawer slides, use a mounting jig or set up parallel blocks to ensure the slide rails on both sides of a drawer box are perfectly aligned. Drive the mounting screws with a Torx T15 bit on low torque mode. Too much torque can compress the particleboard, causing binding or uneven movement. Verify smooth operation by inserting the drawer and cycling it several times before securing the final screws in the back of the cabinet. If the drawer binds on the first few inches, adjust the slide position by loosening screws slightly and tapping the slide lightly until perfectly aligned.
Closet systems—such as adjustable shelving and hanging rods—often rely on pre-notched vertical standards that mount to studs or drywall anchors. For drywall-only installations, use toggle bolts or heavy-duty spiral anchors rated for the load. Drill the anchor pilot hole to the anchor manufacturer’s recommended diameter and push the anchor into place. Drive the mounting screw through the standard into the anchor using an impact driver on moderate torque to prevent deforming the anchor. If the anchor spins in the drywall, remove it, patch the hole, and choose a higher-capacity anchor or install a backer board behind the drywall.
Building Custom Furniture
When crafting custom tables, desks, or case pieces from raw lumber, use a combination of pocket-hole joinery and dowel joints. A pocket-hole jig allows you to drill angled pilot holes using a specific stepped bit. Use a 1/2″ pocket-hole bit and a 15-degree jig to create pocket holes. Drive pocket-hole screws (typically 1¼” coarse-thread) with an impact driver on low torque. The pocket-hole screw’s washer head ensures the adjoining board pulls tight without splitting. After assembly, fill pocket holes with plugs or wood filler and sand flush for a clean finish.
Dowel joints require precise alignment. Using a doweling jig, drill matching holes in both workpieces with a 3/8″ or 1/2″ bit. Insert hardwood dowels coated in wood glue—drive them in lightly with a mallet to seat them. Clamp the pieces together until the glue sets. Avoid driving dowels with an impact driver; use clamps and allow manual tapping to align correctly. Once the glue is dry, you can reinforce the joint by driving a fine screw through the dowel’s exposed end and into a hidden cleat—position the cleat under the tabletop for added strength.
Repairing or Modifying Existing Furniture
When refurbishing hand-me-down furniture, removing old screws often involves dealing with stripped or rusted heads. First, apply a penetrating lubricant (e.g., WD-40 or liquid wrench) around the screw head and wait a few minutes. If the head is stripped, use a screw extractor bit set rated for impact drivers. Fit the extractor bit into the impact driver, set it to reverse at low speed, and gently reverse the screw out. If the extractor fails to bite, use a nut driver or adjustable wrench to grip any remaining head or residual thread.
When retrofitting modern hardware—such as replacing old handles or hinges—measure from existing hole centers to ensure new hardware aligns correctly. Avoid drilling new holes too close to old ones; this can weaken the wood and cause cracks. If necessary, fill old holes with glue and wooden dowels, let them dry fully, then sand smooth and re-drill. Always drive screws with an impact driver in low torque mode or finish with a manual screwdriver to prevent misalignments or overtightening.
Troubleshooting Common Issues
Bit Slippage and Cam-Out
Bit slippage (cam-out) occurs when the bit cannot fully seat into the screw head or if the bit is worn. Ensure you are using impact-rated bits that match the screw head geometry exactly. Insert the bit fully into the chuck until it clicks, and confirm it sits flush. If slippage persists, switch to a higher-quality bit from a reputable brand— such as Milwaukee Shockwave, DEWALT Impact Ready, or Bosch Impact Tough. Additionally, maintain a firm, perpendicular angle between the bit and screw.
Banging or Popping Noises
Occasional popping noises are normal; they indicate the impact mechanism delivering concussive rotational blows. However, if you hear grinding or metal-on-metal scraping, stop immediately. These sounds can signal that the bearings or planetary gears are failing. Continued use in this condition can lead to catastrophic motor or gearbox failure. Have the tool serviced by an authorized service center as soon as possible.
Excessive Vibration or Shaking
Excessive vibration may arise from a bent bit or a worn-out chuck. Inspect the bit for visible bending; if bent, replace it. Check the chuck for play by inserting a new bit and wiggling gently—if there is noticeable movement, service or replace the chuck assembly. Occasionally, vibration occurs when driving very large fasteners that exceed the tool’s recommended capacity. In such cases, switch to a larger impact wrench or use a manual ratchet with a breaker bar to reduce stress on the impact driver.
Reduced Battery Runtime
If your batteries no longer hold a charge for as long as they used to—despite proper charging and storage—it may be time to replace them. Lithium-ion batteries typically rise to peak performance after 20–30 cycles, plateau for a few years, then gradually decline. If you observe swelling, overheating, or rapid discharge under load, retire the battery immediately and recycle it properly. Consider upgrading to larger-capacity batteries (e.g., from 2.0Ah to 5.0Ah) if your usage demands longer runtime.
Battery Not Charging
First, verify that the charger receives power and that the battery contacts are clean. Use a dry cloth to wipe away dust or debris from the contacts. If the charger’s LED indicator does not light up when a battery is inserted, test the charger with a different battery (if available) or test the suspect battery in a different charger (from the same brand). If neither approach yields results, the charger or battery is likely defective. Warranty coverage or service programs vary by manufacturer; contact the brand’s customer support for replacement options.
A Complete Comparison of Key Models
Below is a side-by-side comparison of the previously discussed models, highlighting their main specifications, strengths, and ideal use cases. This chart is not exhaustive but should help you quickly identify which impact driver or alternative tool best suits your furniture installation needs.
| Brand & Model | Voltage (V) | Torque (in-lbs) | Speed Settings | Motor Type | Weight (with battery) | Key Features | Ideal Use Cases |
|---|---|---|---|---|---|---|---|
| DEWALT DCF887D2 | 20 | 1,825 | 3 (0–1,000, 0–2,800, 0–3,250 RPM) | Brushless | ~3.4 lbs (2.0Ah) | 3-speed selector, LED work light, brushless | General furniture assembly, hardwood cabinetry, RTA kits |
| Makita XDT13Z | 12 | 1,400 | 2 (0–1,500, 0–3,000 RPM) | Brushless | ~2.3 lbs (2.0Ah) | AFT safety shutdown, compact, brushless | Tight-space installations, overhead cabinetry |
| Milwaukee M18 Fuel 2853-20 | 18 | 12,000 (foot-pounds) ~ 1,000 ft-lbs | 3 (0–550, 0–1,200, 0–1,900 RPM) | Brushless | ~5.5 lbs (5.0Ah) | High torque, POWERSTATE motor, REDLINK PLUS | Heavy structural bolting, large lag screws, custom loft frames |
| Bosch PS41 | 18 | 1,500 | 3 Adaptive Speed Modes | Brushed/Brushless (varies) | ~3.18 lbs (4.0Ah) | Adaptive speed control, 360° LED ring | Precision furniture trim, general cabinet installation |
| Ryobi P238 | 18 | 1,400 | 3 (0–1,300, 0–2,000, 0–2,800 RPM) | Brushed | ~2.8 lbs (1.5Ah) | Dual LEDs, cost-effective, One+ platform | Budget-friendly DIY, light-to-medium furniture projects |
| Black+Decker BDCDMT1206L | 120 (corded) | ~1,000 | 18+1 Clutch Settings (Drill mode) | Brushed | ~4.8 lbs | Infinite runtime, clutch adjustable | Workshop assembly, near-outlet installations |
| Porter-Cable PCE345 | 20 | 1,400 | 2 (0–1,200, 0–2,800 RPM) | Brushed | ~2.8 lbs (1.5Ah) | Ergonomic grip, affordable | Entry-level furniture assembly, casual DIY |
| WEN 29571 | 20 | 1,600 | 2 (0–1,500, 0–2,800 RPM) | Brushless | ~2.9 lbs (2.0Ah) | Brushless motor, 4 torque settings, dual LEDs | Budget-conscious power users, aftermarket torque control |
Advantages and Limitations of Each Model
DEWALT DCF887D2: Superior torque, advanced electronics, and three-speed versatility make it excellent for a broad range of furniture tasks. The main limitation is price—higher than entry-level models—and a slightly heavier weight than ultra-compact options.
Makita XDT13Z: Its exceptional compactness and AFT technology make it ideal for tight spaces and user safety. The limitation is battery runtime for extended high-torque tasks; carrying an extra battery is advisable.
Milwaukee M18 Fuel 2853-20: Unmatched torque capacity, suitable for heavy structural work beyond typical furniture assembly. The drawback is size, weight, and cost—overkill for smaller, all-wood cabinetry installations.
Bosch PS41: Adaptive Speed Control and LED ring provide precision and enhanced visibility. Limited by slightly higher price and occasional compatibility concerns between old and new battery lines.
Ryobi P238: Inexpensive, accessible, and part of a vast battery ecosystem. The downsides are shorter battery life and plastic housing that may wear faster under professional use.
Black+Decker BDCDMT1206L: Reliable corded power eliminates battery concerns, offers infinite runtime for large, controlled workshop projects. Constraints include lack of impact mechanism and portability, making outdoor or on-site installations cumbersome.
Porter-Cable PCE345: Budget-oriented with reasonable torque for most home furniture installations; limited by a brushed motor, requiring more frequent maintenance and potentially shorter lifespan than brushless counterparts.
WEN 29571: Brushless motor and torque settings at a budget price point; service and warranty support can be less accessible, and torque switching may be slower than competitors.
Comprehensive Tips for Various Furniture Installation Scenarios
Wall-Mounted Floating TV Unit
When installing a floating TV unit, accurate stud location is critical. Use a high-quality stud finder to mark stud positions along the wall at both the top and bottom of the intended unit height. Double-check by tapping on the wall and listening for solid sounds or by drilling small pilot holes to confirm. Once studs are identified, measure and mark the exact location for the mounting rail or bracket. Use a level to ensure the rail will be perfectly horizontal—any tilt will be noticeable when the TV is mounted.
Choose lag screws (typically ¼”–3″ or 5/16″–3″) designed to handle the TV’s weight. Drill pilot holes with a bit slightly smaller than the lag screw’s root diameter—often a 3/16″ or ¼” bit. Insert the lag screw through the bracket’s holes, and drive with an impact driver set to a mid-to-high torque mode—monitor the screw head closely to avoid stripping or overdriving into the stud. If the bracket’s rails can shift horizontally, secure the final lag screws to lock everything in place. Finally, hang the floating unit and attach any securing screws on the bottom. Use a secondary pair of hands or a temporary support beneath the TV shelf until all screws are fully tightened.
Installing Sliding Closet Doors
Sliding closet doors often require mounting top and bottom tracks to both studs and floors or walls. Begin by aligning the top track flush with the closet opening’s ceiling or door jamb, using a level to ensure straightness. Mark the mounting holes—ideally into studs. If studs do not align with track holes, use heavy-duty molly bolts or toggle anchors rated for at least 50 pounds each. Drill pilot holes for anchors, insert anchors, then drive screws through the track into the anchors using an impact driver on low torque to prevent anchor deformation.
Place the bottom track flush with the floor, checking for level and plumb. Use shims under the track’s outboard edge if the floor is not perfectly level; secure each shim in place before screwing the track down. Drive screws with the impact driver, carefully monitoring screw depth to avoid driving screws through laminate flooring or underlying subfloor boards. Once both tracks are installed, install the door rollers or guides according to manufacturer instructions. Use the impact driver on low torque for roller bracket screws, then attach door panels and slide them into place. Adjust the roller tension screws—either with a screwdriver or drill—until doors glide smoothly without binding.
Building a Bookshelf with Adjustable Shelves
For a bookshelf with adjustable shelves, begin by assembling the side and top panels using confirmat screws or pocket holes. Drill pilot holes for confirmat screws with a confirmat bit so that the screw threads find optimal purchase in the particleboard or MDF. Drive confirmat screws with the impact driver on a medium speed setting—high torque will risk stripping the particleboard threads. Use pocket-hole screws to secure the top rail to side panels if you prefer hidden joinery; set pocket-hole screws at 12 in-lbs of torque to avoid compressing the wood.
To install adjustable shelf standards, measure and mark a line down the center of each side panel, ensuring straight vertical alignment. Use a vertical shelf-pin jig or straightedge to drill 5/32″ or 3/16″ pin holes every 32mm (or the standard increment for your hardware). A drill/driver with a depth stop collar or a drill press ensures uniform hole depth. If you choose to use the impact driver with a drill bit adapter, run at a low speed and frequently withdraw the bit to clear dust, preventing “corking” of the bit. Install the shelf standards—metal channels with inserted pins—by gently tapping them into place with a rubber mallet. Finally, place shelves onto pins, ensuring each shelf sits level before loading books.
Assembling a Bed Frame with Slats
Bed frames with wooden slats require careful attention to ensure stability and prevent squeaks. First, assemble the outer frame by fastening side rails to headboard and footboard using carriage bolts, nuts, and washers. Drill pilot holes for the carriage bolts—usually 5/16″ or 3/8″—through the rail ends, ensuring they are square and flush. Drive bolts into headboard or footboard timbers, then secure with washers and nuts. Use the impact driver with a ½” or 9/16″ socket adapter in reverse to start the nut, then switch to forward to tighten fully. Be wary of over-tightening—stop when the bolt head is snug but not crushing the wood.
Space slats evenly across the side rails—typically 2″ apart. If the bed assembly uses pre-manufactured slat kits with metal brackets, drive the provided screws into the slats with a low-to-medium torque setting to prevent splitting. For loose slats, consider using non-skid tape on the underside where the slats contact the side rails to reduce noise. Once all slats are in place, apply a final check: press down firmly at various points on the mattress location to ensure there is no shifting or squeaking. Tighten any loose screws slightly with the impact driver on low torque.
Mounting Hinges and Doors on Cabinets
Installing cabinet doors requires precise drilling of hinge cups and careful placement of hinge screws. First, measure and mark the hinge cup locations—commonly 3″ from the top and bottom of the door edge. Use a 35mm Forstner bit in a handheld drill/driver to bore hinge cups to the correct depth—usually 12mm for concealed European-style hinges. Avoid using the impact driver for this task; a drill/driver with a depth collar is more appropriate. After installing the hinge cups, clamp the door to the cabinet in the closed position. Use a hinge installation jig or measure carefully to align the hinge plates on the cabinet face frame or interior, ensuring flush placement.
Insert hinge screws with a Torx T15 bit in the impact driver on a low torque setting. Drive the screws until the hinge plate is flush against the cabinet surface; avoid driving them too deep or at an angle. Open and close the door to check for binding or misalignment, then use the hinge’s integrated adjustment screws—accessible with either a Phillips head or a small hex driver—to fine-tune vertical, horizontal, and depth alignment. Once the doors align perfectly within the cabinet openings and gaps are uniform, lock down all hinge screws.
Installing Drawer Slides (Traditional and Soft-Close)
For traditional drawer slides (side-mount or under-mount), attach the cabinet-side members first. Use a straightedge or mounting jig to ensure the runners are perfectly parallel to the cabinet floor. Mark pilot holes, then drive screws with the impact driver on a low torque setting. Verify runner alignment by placing the corresponding drawer-side member into the cabinet runners; it should slide freely without binding. If misaligned, adjust by loosening screws slightly, shifting the runner until perfect, and re-tightening.
Soft-close drawer slides typically consist of multiple components—an under-mount slide, a soft-close damper, and mounting clips. Begin by installing the mounting clips on the cabinet’s interior, using screws driven at low torque to prevent plastic clip breakage. Snap the drawer-side members into the clips, ensuring the soft-close mechanism is oriented correctly (usually the damping side faces the back of the cabinet). Place the drawer into the cabinet and lower it onto the drawer-side members. Adjust height via built-in dials on the clips until the drawer sits level. Finally, drive the remaining securing screws at low torque to lock everything in place.
Attaching Decorative Hardware and Trim
Decorative knobs, pulls, and trim pieces require careful measurement and pilot drilling to ensure they are straight and flush. For knobs or pulls on cabinet doors and drawers, mark the hole centers using a cabinet hardware jig or ruler. Drill 3/16″ or 1/8″ pilot holes (depending on screw diameter) before inserting the decorative hardware screws. Drive the screws slowly with the impact driver on the lowest torque setting—stop as soon as the hardware sits snug against the surface. Under-driving can cause hardware to wobble; over-driving can dent or crack veneer.
For decorative trim—such as crown molding or base shoe molding—use finish nails or brad nails. A finish nail gun is often preferred, but if using nails and screws manually, drive a 1¼” or 1½” finish nail with a pin nailer or lightly tap a brad nail with a hammer, then finish with a screwdriver bit in the impact driver to counter-sink. Use a nail set to drive the nail head just below the surface, then fill the indentation with wood filler to match the trim color. Always pre-drill holes for screws in dense trim pieces like oak crown molding to prevent splitting.
Installing Glass or Acrylic Inserts
Glass or acrylic inserts for cabinet doors add sophistication but require care during installation. Ensure that the glass or acrylic panel fits snugly within the routed groove of the door frame. Place protective tape along the inside edges of the groove to cushion the panel. Use small finish screws—usually #4 or #6—with a low torque setting to attach retaining clips or fasteners that hold the panel in place. Tighten until the clip is snug but not so tight as to compress the glass or acrylic against the groove, which can cause cracking.
If using silicone or glazing points, apply a thin bead of clear silicone sealant along the groove’s bottom before inserting the panel. After wiping away excess silicone, insert the panel and secure with glazing points—drive them gently with a small tack hammer, not an impact driver. Finally, apply a finishing trim or rub a caulking gun around the edges to hide the silicone bead. Store the impact driver away from the glass surface—avoid accidental bumps that can crack or shatter the panel.
Repairing or Replacing Hardware on Antique Furniture
When working on antique furniture, preservation of original materials is paramount. Use the smallest driver bit that fully engages the screw head to avoid rounding or cam-out. For period-style screws that use slotted heads, equip the impact driver with a slotted bit rated for impact use—rare but available. Drive slowly on low torque to ensure the driver maintains alignment. If screws are heavily rusted or painted over, apply penetrating oil and let it soak before attempting removal. Use the extractor bit or manual tapping with a slotted screwdriver if necessary, as impact action may crack brittle, aged wood.
When replacing hardware (hinges, handles, or drawer pulls) with modern equivalents, measure hole spacings carefully. Some modern screws may be shorter or have thicker threads than antique screws. In mahogany or walnut veneers, mismatched screws can cause splitting or veneer bulging. To avoid this, choose screws with similar thread pitch and length to the originals, or use threaded inserts to adapt modern hardware to older materials. After attaching new hardware, apply a small amount of wood wax around the screw holes to protect against moisture ingress and to maintain the antique piece’s finish.
Maintenance of Installed Furniture
Once furniture is installed—particularly wall-mounted or heavy cabinetry—regular maintenance ensures safety and longevity. Every six months, check all visible screws, hinges, and brackets for signs of loosening or corrosion. Tighten any loose screws with the impact driver on the lowest torque setting; for delicate veneer surfaces, finish tightening with a manual screwdriver to prevent overdriving. If you notice cabinet doors sagging slightly, adjust the hinge screws behind the hinges with small increments— tighten or loosen by one-quarter turn until doors realign perfectly.
For drawers that have become sticky or that squeak, remove a small amount of furniture wax or paraffin candle and rub it along the metal slides. If the slides are ball-bearing types, remove the ball-bearing impingement and apply a thin coat of lithium-based grease—using a small brush or a disposable glove. Reinsert the ball bearings and cycle the drawer a few times to distribute the lubricant evenly. Because solvents can damage finishes, avoid WD-40 or similar products inside cabinetry; instead, stick with lubricants specifically formulated for furniture or drawer slides.
If furniture is exposed to humid or fluctuating climates (such as bathrooms or sunrooms), wood components can warp or joints can loosen. Monitor for small gaps at corner joints or misaligned doors, and adjust fasteners accordingly. For wall-mounted pieces, confirm that wall anchors and studs show no signs of stress—look for small gaps between cabinet backs and walls. If you detect movement, remove the load from the furniture, tighten or replace anchors, and ensure the back frame is flush with the wall studs. Regular checks prevent sudden failures that could lead to costly damage or injuries.
Conclusion
Mastering the use of a household electric impact drill for furniture installation transforms daunting tasks into efficient, precise, and satisfying projects. With the right combination of safety precautions, proper preparation, appropriate accessories, and high-quality tools, even complex installations—such as mounting heavy kitchen cabinets or custom-built furniture—become manageable for DIYers and professionals alike. This guide has provided detailed insights into safety gear, workspace setup, pre-drilling considerations, tool and accessory selection, step-by-step usage instructions, maintenance, common pitfalls, and recommended brands and models. We have also explored specific installation scenarios, from mounting floating shelves to assembling custom bed frames, offering actionable tips to ensure each task is completed accurately and safely.
Choosing the right impact driver involves balancing torque requirements, ergonomics, battery life, and budget. While premium models like the DEWALT DCF887D2 or Milwaukee M18 Fuel 2853-20 deliver unmatched power and advanced features, mid-tier options such as the Makita XDT13Z, Bosch PS41, or WEN 29571 provide excellent performance for most household and light-professional tasks. Budget-conscious DIYers will appreciate the Ryobi P238, while those needing corded reliability can rely on the Black+Decker BDCDMT1206L. Regardless of brand, prioritizing impact-rated bits, maintaining batteries, and properly preparing workpieces will ensure optimal results.
As furniture styles evolve and new materials—such as engineered woods, laminates, and composites—enter the market, the household electric impact drill remains a steadfast ally. The tool’s unique ability to combine rotational force with concussive impacts streamlines screw driving, minimizes damage, and reduces operator fatigue. By adhering to the guidelines and best practices outlined in this guide, you can tackle any furniture installation challenge with confidence, from simple flat-pack assemblies to elaborate built-in cabinet systems. Embrace the power and versatility of your impact drill, keep it well-maintained, and enjoy years of efficient, professional-quality furniture installations.
