Our Location
304 North Cardinal St.
Dorchester Center, MA 02124
304 North Cardinal St.
Dorchester Center, MA 02124
The installation of a hollow drill bit positioning pin is a crucial process that directly determines the accuracy, efficiency, and safety of drilling operations. Hollow drill bits, also known as core drill bits or annular cutters, are specialized tools widely used in construction, metalworking, and masonry applications where precise cylindrical holes are required. Unlike conventional twist drill bits that remove the entire material within the cutting area, hollow drill bits cut only the perimeter of the hole, leaving a core that can be ejected. This design not only saves time and energy but also extends the service life of the drill. However, one key accessory that ensures the proper alignment and function of hollow drill bits is the positioning pin, also called a pilot pin. The positioning pin acts as both a centering guide and an ejector mechanism, helping the operator achieve high precision when starting a hole and enabling safe removal of the cut core after drilling. To understand how to install the hollow drill bit positioning pin properly, it is necessary to examine the detailed steps, the role of the pin, and the specific models available from different tool brands.
Installing a positioning pin may sound straightforward, but when considered carefully, it is a process that involves understanding the mechanical design of the hollow drill bit, the chuck system of the drilling machine, and the compatibility of accessories provided by various manufacturers. Many tool brands such as Bosch, Hilti, Makita, DeWalt, Fein, Hougen, Evolution Power Tools, and Milwaukee manufacture hollow drill bits and pilot pins designed for different materials and machine types. These brands provide not only the drill bits themselves but also carefully engineered positioning pins in multiple sizes and configurations to match the requirements of steel, concrete, or wood drilling. For instance, Bosch HSS-G Annular Cutters with Pilot Pins (model series 2608577xxx) and Hougen Pilot Pins (models 10531, 10532, 10533, etc.) are well known in industrial drilling. Meanwhile, Hilti TE-Y-BK Hollow Drill Bits with Pilot Pins are widely used in concrete dust extraction systems. Each of these models requires correct installation to prevent tool failure, maintain drilling accuracy, and ensure operator safety.
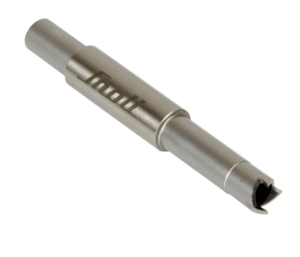
Before learning how to install the positioning pin, one must understand its mechanical role within the hollow drill bit system. The pin is typically a slender cylindrical rod inserted into the center of the hollow drill bit, extending slightly beyond the cutting edge. When the drilling operation begins, the tip of the pin makes the first contact with the work surface, thereby stabilizing the tool and preventing bit wandering or misalignment. This guidance ensures that the hollow drill bit starts cutting exactly where intended, which is especially important in structural steel drilling, where accuracy is critical to prevent damage to surrounding material. In addition to its guiding function, the positioning pin also plays a vital role in ejecting the slug (the cylindrical core left inside the bit after drilling). Once drilling is complete and the bit is withdrawn, the spring-loaded action of the pin pushes the core out of the hollow drill bit, reducing downtime and preventing clogging. This dual purpose—guiding at the start and ejecting at the end—makes the correct installation of the pin essential for smooth drilling operations.
The installation process varies slightly depending on the manufacturer and the drill system in use, but the general principles remain consistent across brands. Below is a detailed explanation of the installation process with examples of well-known models.
The first step in installing a hollow drill bit positioning pin is to prepare the drilling machine and the hollow drill bit itself. The drill should be disconnected from the power source for safety, whether it is an electric drill, a magnetic drill press, or a rotary hammer with core drilling capability. For example, when using the Hougen HMD904 Magnetic Drill with Hougen RotaLoc Plus Cutters, the machine must be stable and the spindle should be inspected for cleanliness to prevent misalignment. The hollow drill bit, such as a Hougen RotaLoc Plus Cutter 12004, should also be cleaned to remove any metal shavings or debris from previous use. Proper preparation prevents damage and ensures that the positioning pin seats correctly within the bit.
Each hollow drill bit requires a positioning pin of specific length and diameter to match its cutting size. For instance, Hougen Pilot Pin model 10531 is typically used for cutters ranging from 7/16″ to 1/2″ diameter, while Hougen Pilot Pin model 10532 is suitable for cutters in the 9/16″ to 1-1/16″ range. Similarly, Fein KBH Pilot Pins come in multiple lengths for different annular cutters, and Evolution Power Tools Pilot Pins (EVPIN01) are designed for the company’s annular cutter sets. Selecting the wrong pilot pin can result in poor centering, improper slug ejection, or even breakage of the drill bit. Therefore, consulting the manufacturer’s compatibility chart is essential before installation.
Once the correct pin has been selected, it should be inserted through the shank end of the hollow drill bit so that it passes through the center bore and protrudes slightly from the cutting end. On models like the Bosch HSS Annular Cutter 2608577113, the pin is inserted into the Weldon shank, which has two flat sections that lock into the drill arbor. The pin should slide freely within the bore without binding. Some systems, such as Hilti TE-CD and TE-YD Hollow Drill Bits with Dust Removal Pins, may require aligning the pin with internal grooves designed for dust extraction. In all cases, the positioning pin should extend approximately 5–10 mm beyond the cutting edge when properly installed.
After the positioning pin has been inserted into the drill bit, the bit itself must be attached to the drill arbor or chuck. For Weldon shank cutters, this involves aligning the flat surfaces of the shank with the set screws on the arbor, then tightening securely with an Allen wrench. When using magnetic drill presses such as the Hougen HMD904 or the Evolution EVO28 Magnetic Drill, the hollow drill bit with the installed pilot pin is secured into the arbor by locking screws or quick-change mechanisms. Some systems, like Makita’s Core Drill Accessories (model B-43298 pilot pin for 35mm–50mm cutters), feature quick-change arbors that allow tool-free installation. Regardless of the system, ensuring the bit and pin are firmly secured is critical for safe operation.
Before beginning drilling, the operator should manually press the positioning pin to ensure it moves freely within the hollow drill bit. The pin should retract smoothly under finger pressure and spring back into place when released. This indicates that the pin will function correctly both as a centering guide and as an ejector. If the pin binds or does not return properly, it may be installed incorrectly, damaged, or contaminated with debris. For example, in Hougen’s RotaLoc Plus system, the pilot pin is spring-loaded to allow automatic core ejection, and any obstruction can prevent the system from functioning as intended.
Once the hollow drill bit with the installed positioning pin is secured and tested, drilling can commence. The positioning pin makes initial contact with the work surface, creating a small dimple that helps guide the annular cutter into the material. As the drilling continues, the pin retracts into the hollow drill bit while maintaining alignment. After the hole is complete and the drill bit is withdrawn, the pin automatically pushes the slug out of the cutter, readying the bit for the next operation. Brands like Hilti (TE-Y-BK dust control drill bits) incorporate positioning pins that also connect to dust extraction systems, combining guidance, ejection, and dust removal in one mechanism.
