Our Location
304 North Cardinal St.
Dorchester Center, MA 02124
304 North Cardinal St.
Dorchester Center, MA 02124
The hollow drill bit is one of the most widely used tools in construction, woodworking, metalworking, and industrial installation projects. One of the key accessories that improve its efficiency and precision is the positioning needle, which is designed to guide the hollow drill bit to the exact drilling spot and prevent slipping or deviation. The positioning needle is a crucial part of the drilling process, especially when accuracy is needed in drilling holes in concrete, wood, tiles, or steel. Understanding how to use the hollow drill bit positioning needle correctly can significantly improve the efficiency of the work, extend the service life of the drill bit, and ensure cleaner, more accurate drilling results. This detailed report provides a complete explanation of how to use the hollow drill bit positioning needle, the tools and materials required, the different steps involved, precautions, advantages, and an overview of popular brands and models available in the market.
The hollow drill bit positioning needle is a guiding rod, typically made of hardened steel, that fits into the center of the hollow drill bit. When the drill begins operation, the positioning needle provides an anchoring point that stabilizes the bit on the work surface. Without this positioning needle, the drill bit might wander, causing damage to the material and resulting in inaccurate holes. This accessory is widely used in both professional construction sites and household DIY projects. The positioning needle is especially important when drilling into hard surfaces such as reinforced concrete, ceramic tiles, and thick wood panels. By guiding the hollow drill bit, the positioning needle allows the operator to control the initial drilling point and ensures that the hollow drill bit cuts smoothly into the material.
The positioning needle has multiple roles in the drilling process. First, it prevents the drill bit from slipping during the initial drilling stage, especially when working on smooth surfaces like polished tiles or metals. Second, it helps distribute the initial impact force more evenly, reducing the risk of the drill bit chipping or breaking. Third, the positioning needle allows the user to achieve straight and accurate holes, which is essential in construction and assembly projects. Using the positioning needle also improves safety because it minimizes sudden jerks of the drill. Furthermore, it reduces wear on the hollow drill bit by ensuring that the cutting edges engage with the surface at the correct angle. This significantly extends the lifespan of both the drill bit and the drilling machine.
Select the Appropriate Drill Bit and Positioning Needle
Begin by choosing the correct hollow drill bit for the material you are drilling. Hollow drill bits come in different diameters and lengths depending on the application. The positioning needle should match the size and type of the drill bit. For example, a 16mm hollow drill bit requires a positioning needle designed for that diameter. Always ensure compatibility between the two to avoid improper fitting.
Install the Positioning Needle into the Hollow Drill Bit
Insert the positioning needle into the center of the hollow drill bit. Many hollow drill bits are designed with a central slot or guide where the needle can be securely fitted. Push the needle until it locks into position. Some advanced models, such as Bosch SDS-plus and Hilti TE-CX systems, use quick-release mechanisms that make installing the positioning needle easier.
Attach the Drill Bit to the Drilling Machine
After installing the positioning needle, attach the hollow drill bit to the chuck of your rotary hammer or impact drill. Make sure the drill is switched off and unplugged when attaching the bit. For SDS systems, insert the bit until you hear a click sound, indicating it is properly locked. For standard chucks, tighten the chuck key to hold the bit securely.
Mark the Drilling Point on the Material
Use a pencil, chalk, or marker to indicate the exact point where the hole needs to be drilled. This ensures that you know where to position the needle. On slippery surfaces such as ceramic tiles, placing masking tape over the drilling point can help prevent slipping.
Position the Needle on the Marked Point
Place the tip of the positioning needle directly onto the marked drilling spot. Hold the drill firmly with both hands and apply light forward pressure to ensure stability.
Begin Drilling Slowly
Start the drill at a slow speed, allowing the positioning needle to penetrate slightly into the material. This step secures the bit and prevents wandering. Once the positioning needle has created a small indentation, increase the speed and pressure gradually.
Drill Until the Needle is No Longer Needed
Continue drilling until the hollow drill bit’s cutting edges are fully engaged with the material. At this point, the positioning needle has already served its purpose, and in some designs, it can be removed if desired. For continuous drilling in deep holes, the positioning needle may automatically retract or stay in place as part of the system.
Complete the Hole Drilling
Once the drill bit is properly stabilized, continue drilling at a steady speed until the hole is completed. Withdraw the bit carefully to avoid damaging the edges of the hole.
Remove the Positioning Needle and Clean the Bit
After finishing, detach the drill bit from the machine and remove the positioning needle. Clean both the bit and the needle to remove dust and debris, ensuring they are ready for future use.
When using the hollow drill bit positioning needle, several precautions should be taken to ensure safety and prolong tool life. Always wear safety goggles and gloves to protect yourself from flying debris. Ensure the drill machine is compatible with hollow drill bits and positioning needles, as not all machines support this accessory. Do not apply excessive force on the drill, as the positioning needle is designed to guide, not to withstand high pressure. Overheating of the drill bit should be avoided by occasionally pausing and allowing the bit to cool. For metal or concrete drilling, using water cooling or lubrication may also improve performance. Furthermore, ensure that the positioning needle is always straight and not bent, as a damaged needle can cause misalignment and unsafe drilling.
Using the positioning needle provides numerous benefits. It improves drilling precision by preventing wandering of the hollow drill bit. It ensures safety by stabilizing the drill during the initial drilling phase. It extends the lifespan of the drill bit by reducing uneven stress. It also reduces work time, as accurate positioning means fewer mistakes and less need for corrections. For professionals in construction and woodworking, the positioning needle is an indispensable accessory that increases productivity. Even for household DIY users, it makes drilling much easier and cleaner.
Several leading brands manufacture high-quality hollow drill bits and positioning needle systems.
Bosch: Bosch offers SDS-plus and SDS-max hollow drill bit systems with integrated centering pins. Models such as Bosch SDS-plus 1618596150 include positioning accessories designed for masonry and reinforced concrete drilling.
Hilti: Hilti’s TE-CX and TE-YX hollow drill bits come with guide needles for precision drilling in concrete and stone. The Hilti TE-C-DRS system integrates dust removal with a centering pin.
Makita: Makita provides hollow core bits with removable guide pins, such as the Makita D-42444 model, suitable for use with rotary hammers.
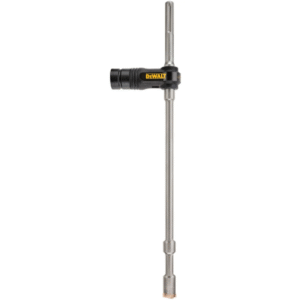
DeWalt: DeWalt’s core drill bit sets, including models like DT90201-QZ, come with positioning rods that help ensure accuracy in construction drilling.
Milwaukee: The Milwaukee MX4 and MX6 series include centering pins as part of their hollow drill bit design, specifically engineered for high-performance masonry drilling.
Hitachi (now Hikoki): The Hikoki SDS core bits include positioning pins for use with heavy-duty rotary hammers. Models like the Hikoki 752812 system are widely used in industrial drilling.
Starrett: Known for precision cutting tools, Starrett offers hollow drill bits with centering accessories for metal and tile drilling.
The positioning needle is widely applied in different industries. In construction, it is used for drilling anchor holes in concrete and installing rebar connections. In woodworking, it ensures precise hole alignment for joinery. In tile work, it prevents the drill from slipping on glossy surfaces. In metal fabrication, it helps create accurate starter points before drilling through steel or iron. Even in household tasks like installing shelves or fixtures, the positioning needle ensures that holes are drilled exactly where needed.
The hollow drill bit positioning needle is a small but essential accessory that enhances the precision, safety, and efficiency of drilling operations. By guiding the hollow drill bit during the initial drilling stage, it prevents slipping, ensures accurate holes, and extends the lifespan of the tool. Proper usage involves selecting the correct needle, installing it correctly, and following the right drilling techniques. With major brands like Bosch, Hilti, Makita, DeWalt, Milwaukee, Hikoki, and Starrett offering advanced positioning systems, users have a wide range of options to suit their needs. Whether for professional construction work or simple household projects, mastering the use of the hollow drill bit positioning needle is an important skill that brings better results, higher safety, and greater efficiency.
