Our Location
304 North Cardinal St.
Dorchester Center, MA 02124
304 North Cardinal St.
Dorchester Center, MA 02124
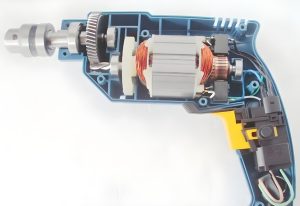
How to disassemble a small electric drill bit?
The exact steps for small power drill bit removal may vary depending on the brand and model, but generally, you can follow these steps:
Power off: First make sure the power drill is off and unplug the power plug to prevent accidental start.
Remove the battery or plug: If it’s a battery-powered drill, remove the battery; if it’s a plug-in drill, make sure the power cord is unplugged.
Find the set screws: Use a suitable screwdriver to find the screws that hold the drill bit in place. Typically these screws are on the bottom or side of the drill bit.
Remove the screws: Unscrew the screws one by one. You may need to use the correct size and type of screwdriver and be careful not to damage the screws or screw holes.
Remove the drill bit: Once the screws are all removed, the drill bit should come off easily. Sometimes it may be necessary to gently twist or tap with the tool to loosen the drill bit.
Cleaning and maintenance: After disassembly, the electric drill bit and related parts can be cleaned and necessary maintenance can be performed, such as lubrication or replacement of worn parts.
Reinstallation: After completing maintenance or cleaning, reinstall the drill bit onto the drill and make sure all parts are installed and tightened correctly.
Reconnect the power source: If it is a plug-in drill, replug the power cord; if it is a battery-operated drill, reinstall the battery.
Test: After reconnecting the power, turn on the drill for a brief test to make sure everything is working properly.
Remember, safety is the most important thing. When performing any maintenance or disassembly work, always use caution and follow the guidelines and precautions provided by the manufacturer. If you’re not sure what to do, it’s best to seek professional help.
